New Report: Discover key insights from over 5 million interactions
Download NowNew Report: Discover key insights from over 5 million interactions
Download Now
TLDR: Real estate teams and brokerages can use AI to automate repetitive tasks like content creation, lead capture, scheduling, research, and document analysis, allowing them to focus more time on closing deals and building client relationships.
Real estate teams and brokerages waste countless hours on repetitive tasks. If I could provide ONE piece of business advice in 2026 is start by writing down every single task you do in a week.
Next to each task grade it with a 1, 2, or 3
1 = Only I can complete this task. This would include high level strategy, building stratgic relationships or growing a team
2 = Someone else could complete with if I develop a high quality SOP. This would include client outreach, deal reviews, or agent coaching.
3 = AI or a tool can complete this right now with proper configuration. This would include listing descriptions, lead capturing, content creation, or lead routing.
This article is designed to help you get started with stage 3 by providing practical AI How Tos and tool identification.
Most teams that fail with AI don't fail because the tools are hard.
They fail because they handed agents a new tool with no context, no champion, and no plan then acted surprised when nobody used it.
Before you roll out a single tool from this list, get your people ready. Here's what that actually looks like.
Pick one person to go first. Don't try to get your whole team using AI at the same time. Find the agent on your team who's naturally curious, a little tech-comfortable, and willing to try something new. They become your AI champion. They test the tools, figure out what works, and show everyone else.
Set the right expectation upfront. The conversation that kills AI adoption before it starts is "this is going to replace part of your job." The conversation that actually works is: "This is going to handle the stuff that's wasting your time so you can spend more time on the stuff that makes you money."
Pick one problem, not ten. The most common mistake team leads make is sending a list of five tools and saying "check these out." Nobody does. Pick the one problem costing your team the most time right now, get it working then add the next one.
Give it 30 days before you judge it. AI tools compound. The first week feels rough as the setup isn't perfect and the output needs more editing than expected. By week four, agents have found their rhythm, the prompts are refined, and the time savings are obvious.
Remind your team that AI output needs their judgment. The biggest misuse of these tools is treating the output as finished. It's not. You will need to likely refine it and use your expertise to stategically edit it.
The problem: Writing a listing description from scratch takes 30 to 45 minutes per property. The formula is almost always the same. You
The fix: ChatGPT turns your showing notes into a polished draft in under 60 seconds. Your agent's only job is to review it and add one local detail the AI couldn't know.
Time saved: 25 to 40 minutes per listing.
Here's how you get started:
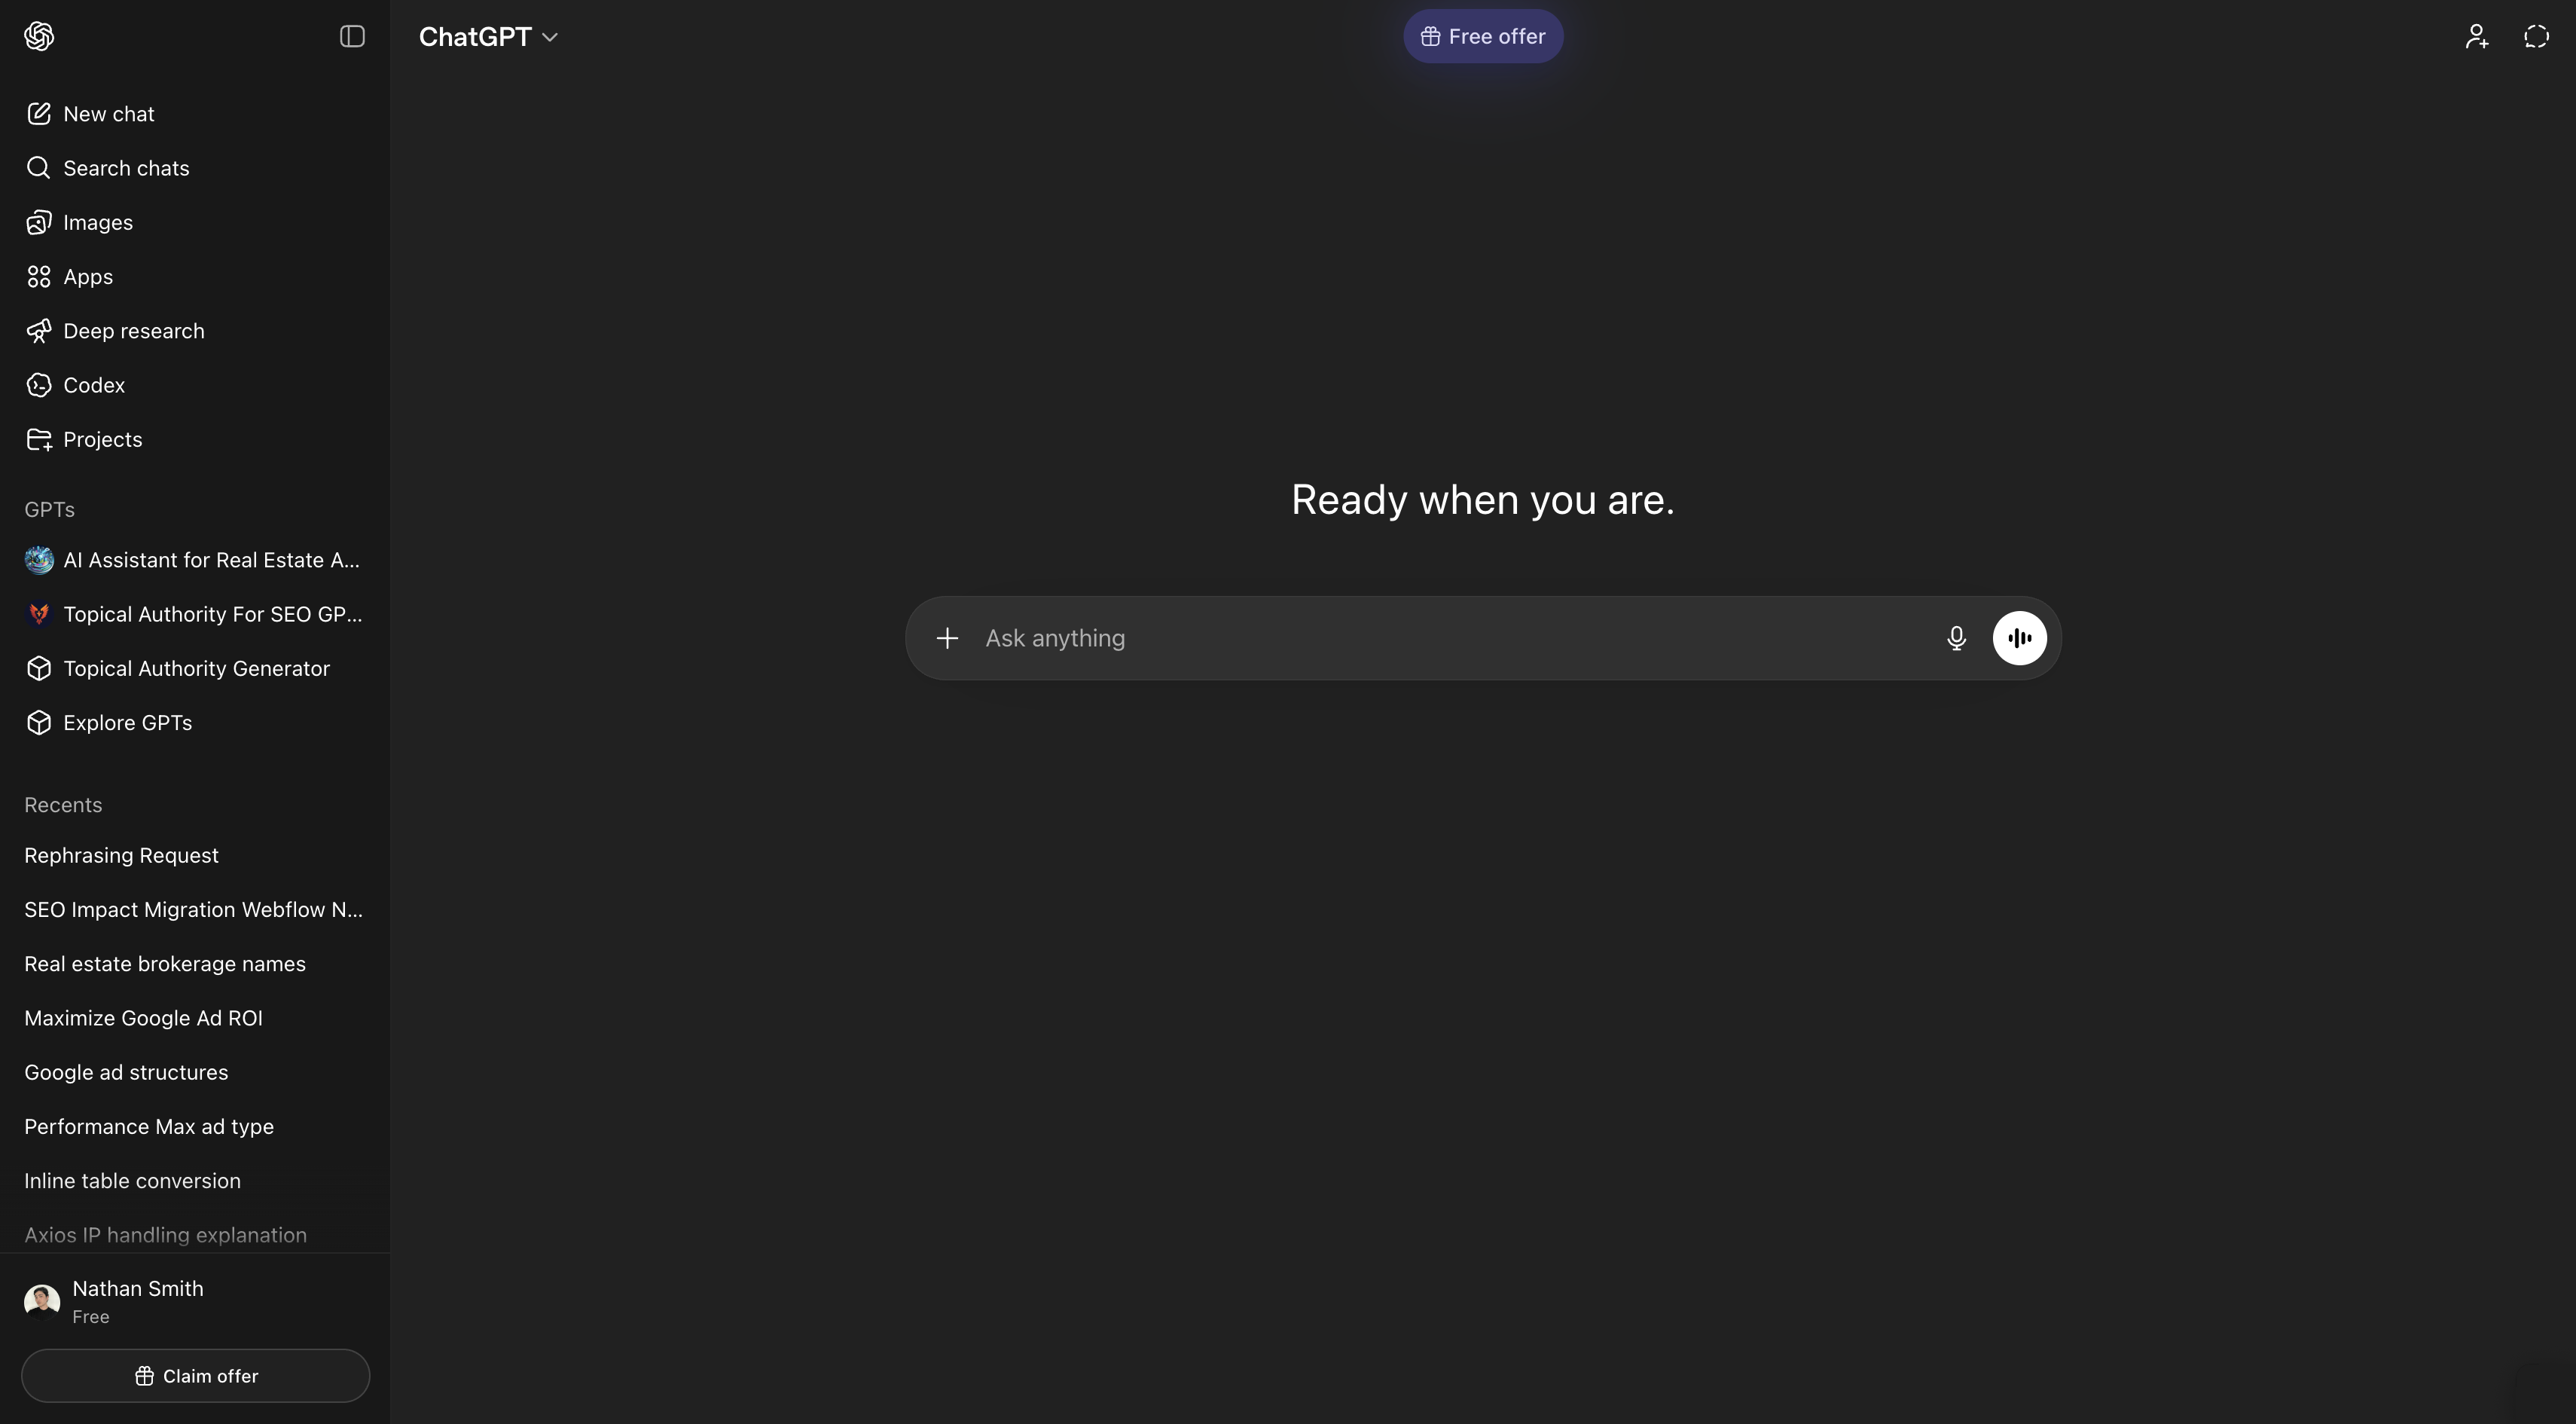
Step 1: Go to chat.openai.com. Create a free account. A ChatGPT Plus subscription at $20/month gets meaningfully better results especially during high traffic times so its definetely worth it for teams doing more than a few listings a month.
You can either use ChatGPT with a saved prompt or you will need to upgrade to the Plus subscription to be able to create your own GPTs
Not sure where to start? We built a collection of ChatGPT prompts to help you with your day to day job.
Step 2: Go to the GPT Builder. In ChatGPT, click the left side titled Explore GPTs then in the top right → Create. This opens a two-panel screen: a configuration form on the left and a live preview on the right.

Step 3: Name your GPT and write your instructions. This is the most important step, as an effective listing prompt defines it's where exactly how your listing GPT behaves.
In the Instructions field, paste something like this (customize it for your team).
"You are a listing description writer for [Team Name], a real estate team in [City/Market]. When given property details, you write polished, buyer-focused listing descriptions that follow this format:
When the agent provides property notes, ask one clarifying question if something critical is missing (e.g., the neighborhood or a standout feature). Otherwise, write the description immediately."
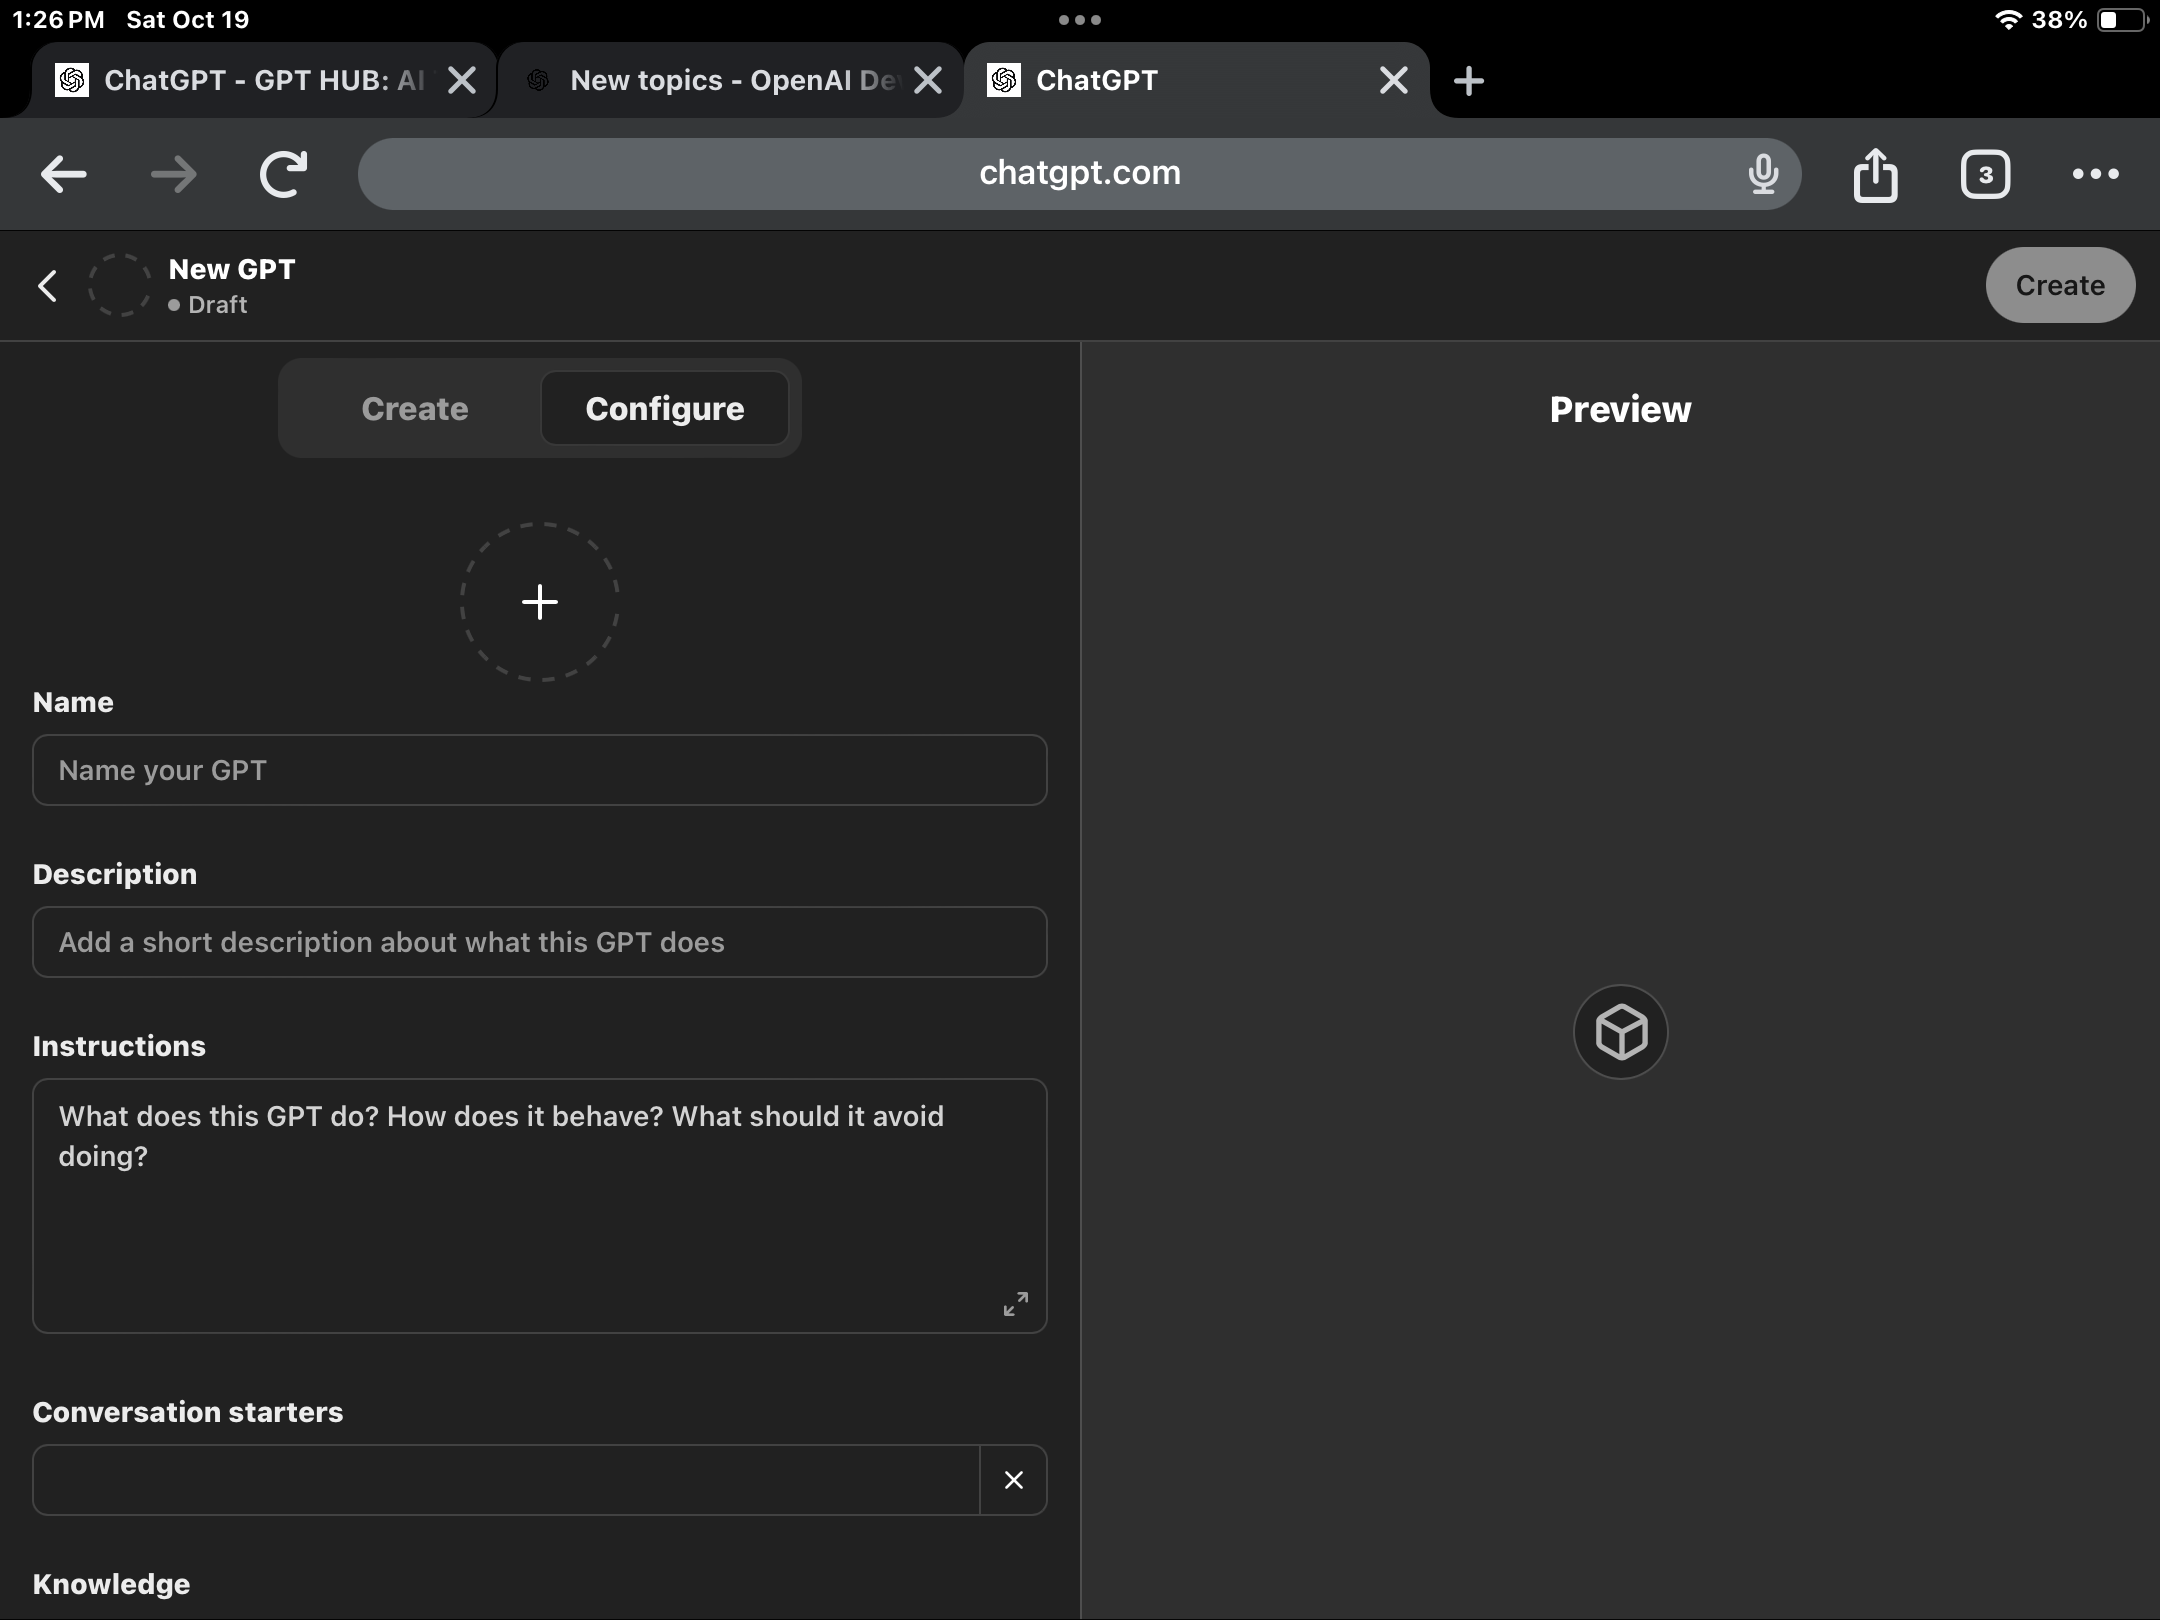
Step 4: Upload two to three of your best existing listing descriptions as example files. In the Knowledge section of the GPT builder, upload a text file containing three or four listing descriptions your team has written and is proud of. The GPT will naturally mirror the rhythm and vocabulary of your best work.
Step 5: Set the conversation starter. Add a conversation starter that agents see when they open the GPT: "Paste your property notes below and I'll write your listing description." This removes any ambiguity about what to do.
Step 6: Test it before sharing. In the preview panel on the right, paste some rough property notes that your agents actually take during a showing. Run it two or three times with different property types. Check that the output matches your format and doesn't include any of the banned phrases.
Step 7: Share the link with your team. Once published, your Custom GPT has a unique URL. Drop it in an email, add it to your team's Google Doc of resources, or bookmark it on every office computer.
From there your team can go in, paste their notes and get an on brand description.
The problem: Agents walk into listing appointments and buyer consultations with general knowledge about the market but not the specific, current answers that actually impress clients and earn trust.
The fix: Claude is an AI research assistant that can synthesize market context, neighborhood information, comparable sales logic, and talking points in minutes before every appointment.
Time saved: 40 to 90 minutes per appointment.
Step 1: Go to claude.ai and create a free account. Claude Pro at $20/month unlocks longer conversations and faster responses. Claude also has their version of custom GPTs called Projects as well as a very powerful tool called Cowork which can take you to the next level.

Step 2: Before a listing appointment, use this prompt to build your pre-meeting brief:
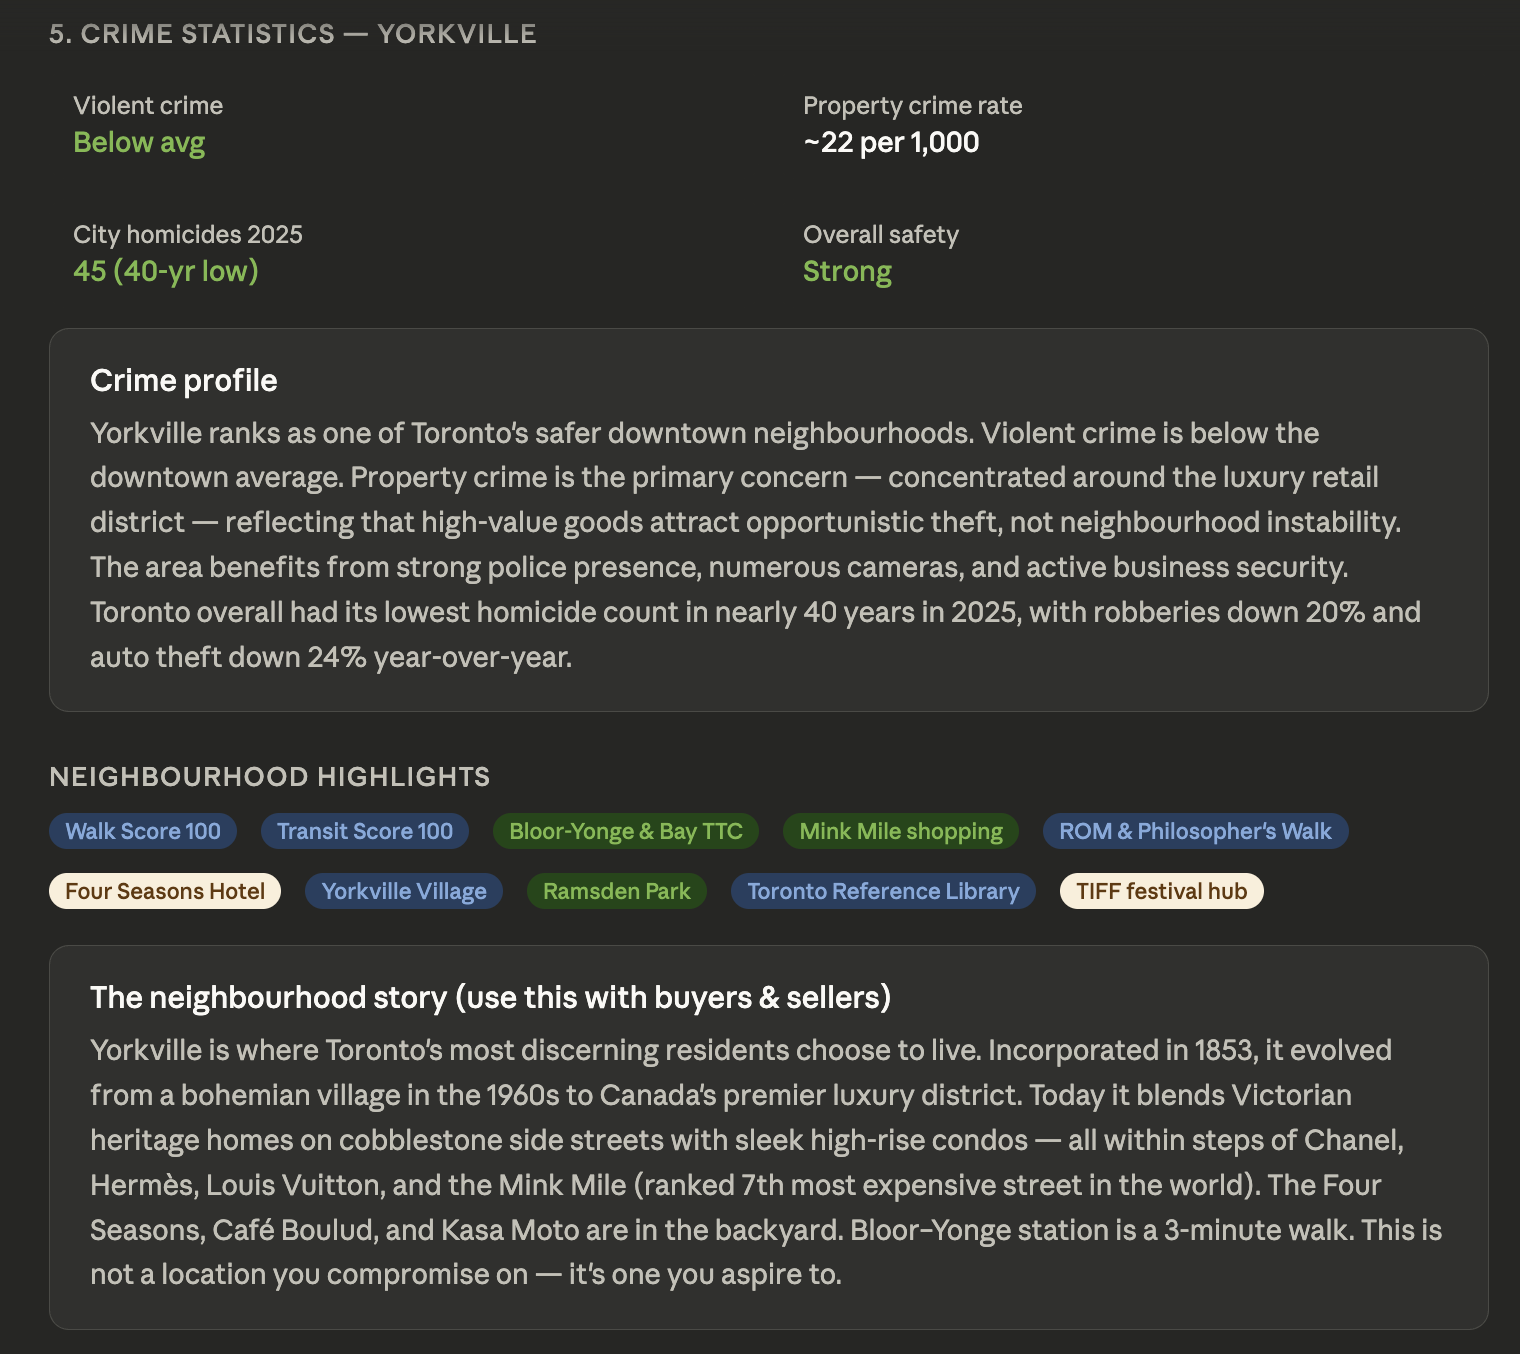
"I have a listing appointment tomorrow for a home at [address or neighborhood]. It's a [X-bed, X-bath, approx sq ft] built in [year]. Help me prepare by: (1) summarizing what buyers and sellers typically care about most in this type of market, (2) giving me a framework for explaining how I'd price this home based on days-on-market trends and list-to-sale ratios, (3) listing five questions I should ask the seller to understand their timeline and motivation, (4) suggesting two or three objections I'm likely to hear and how to address them and (5) crime statistics, interesting neighborhood information and comparable sales"
What's great about Claude is it will then do Google searches of these terms, read the website content then pull together a detailed report.
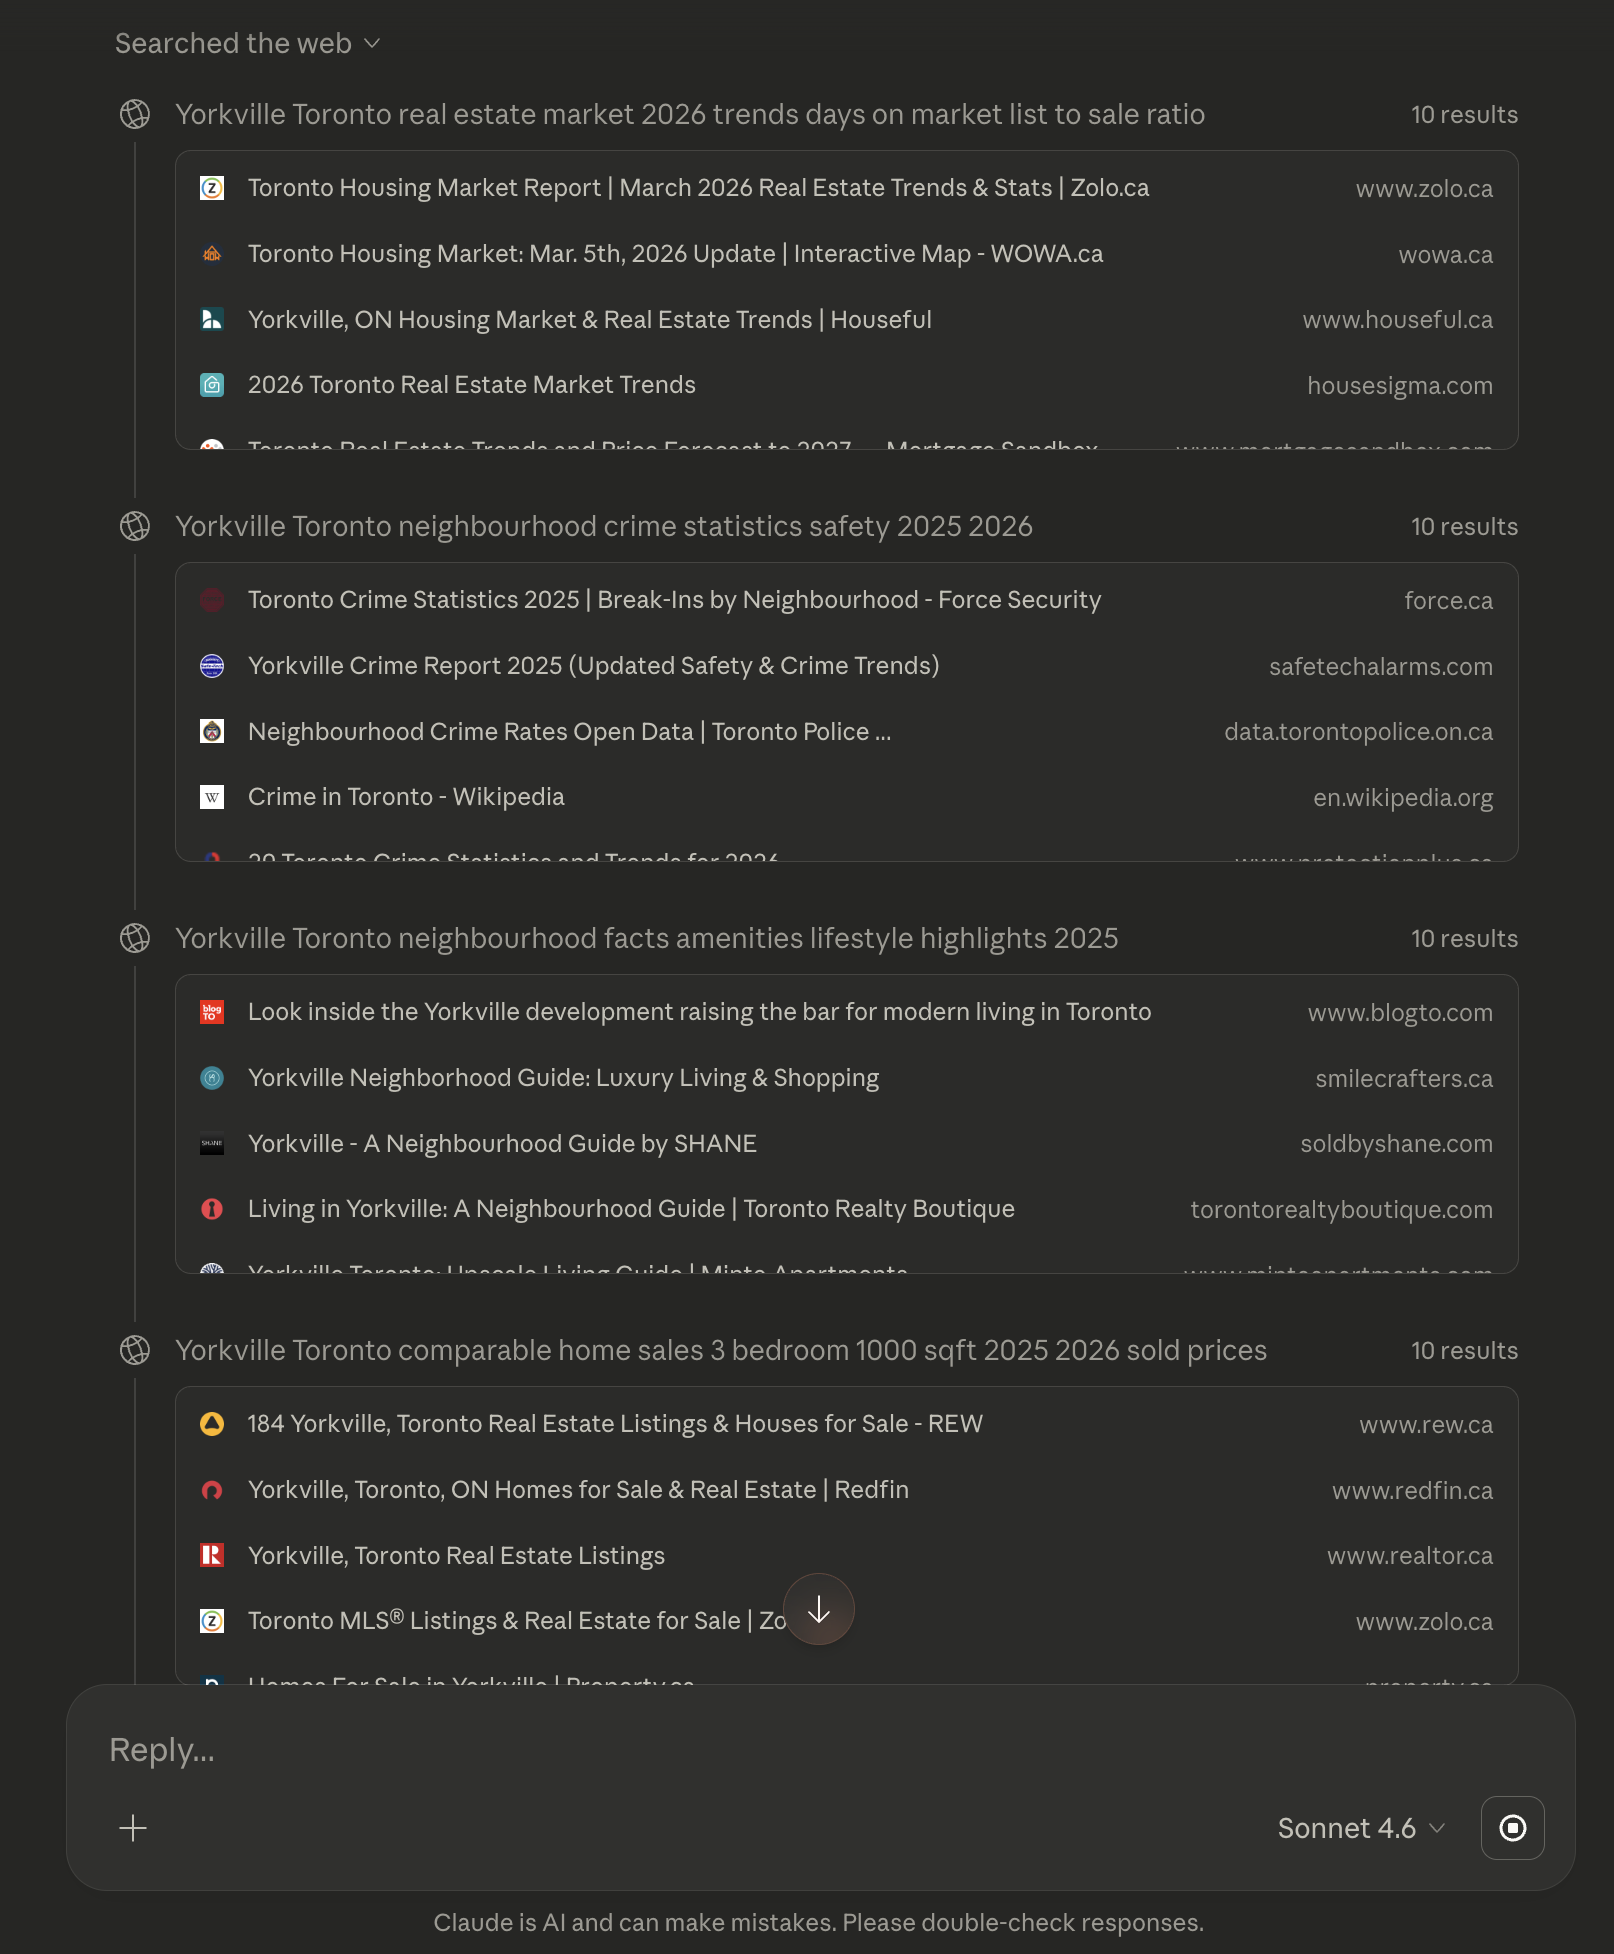
Once it has completed research for you it will return the information into a digestable format the you can save to a Google Doc or review so you are prepared for the conversation.
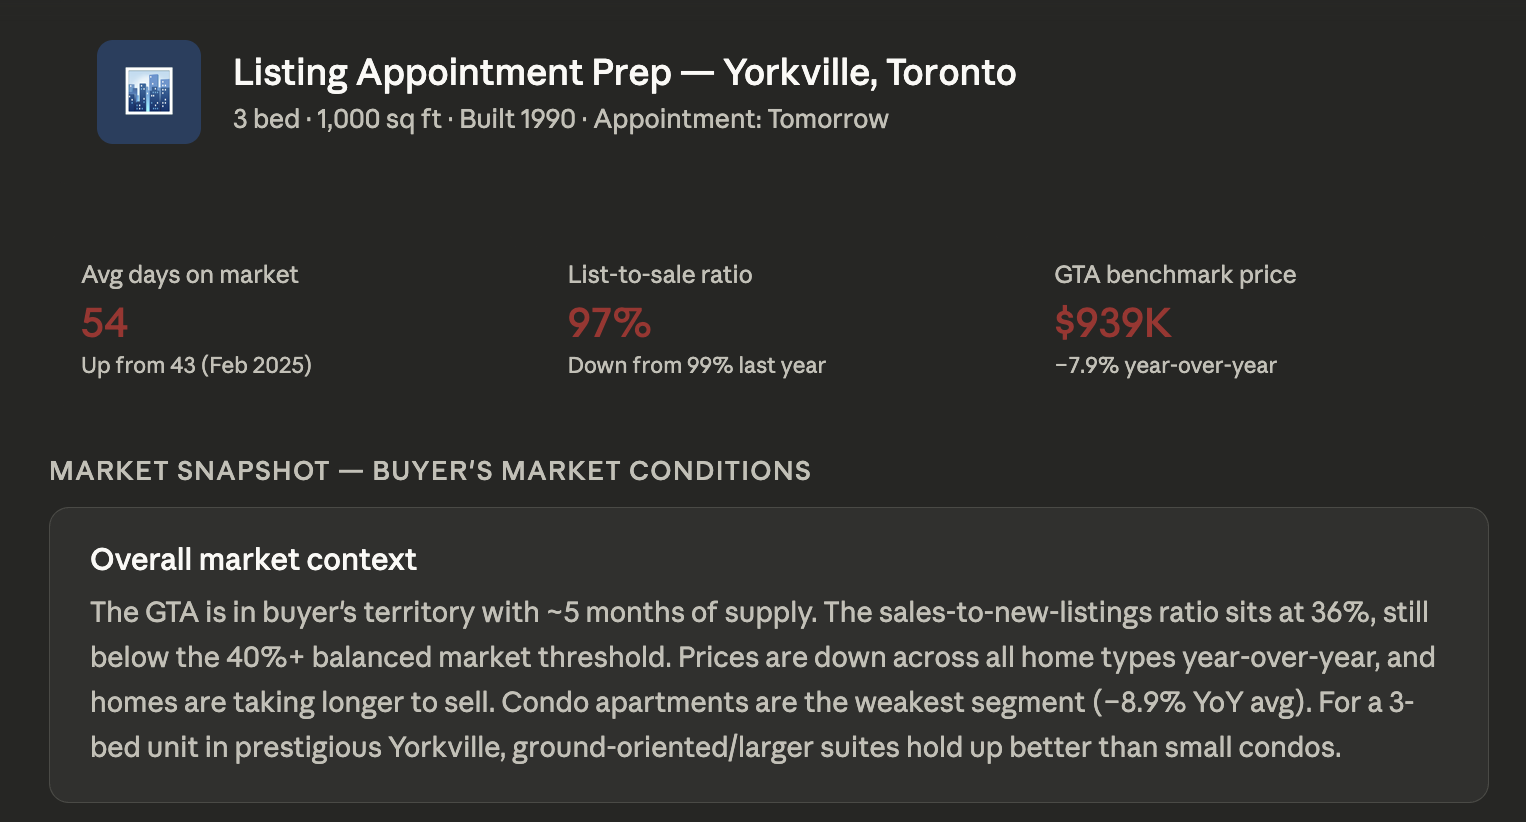
The biggest gain for this is not the comparable sales, as that information can be quickly and more accurately found within the MLS sold data but instead getting into the psychology of what the seller is likely concerned about.
While these concerns may not come up, be prepared for them helps you close the deal.
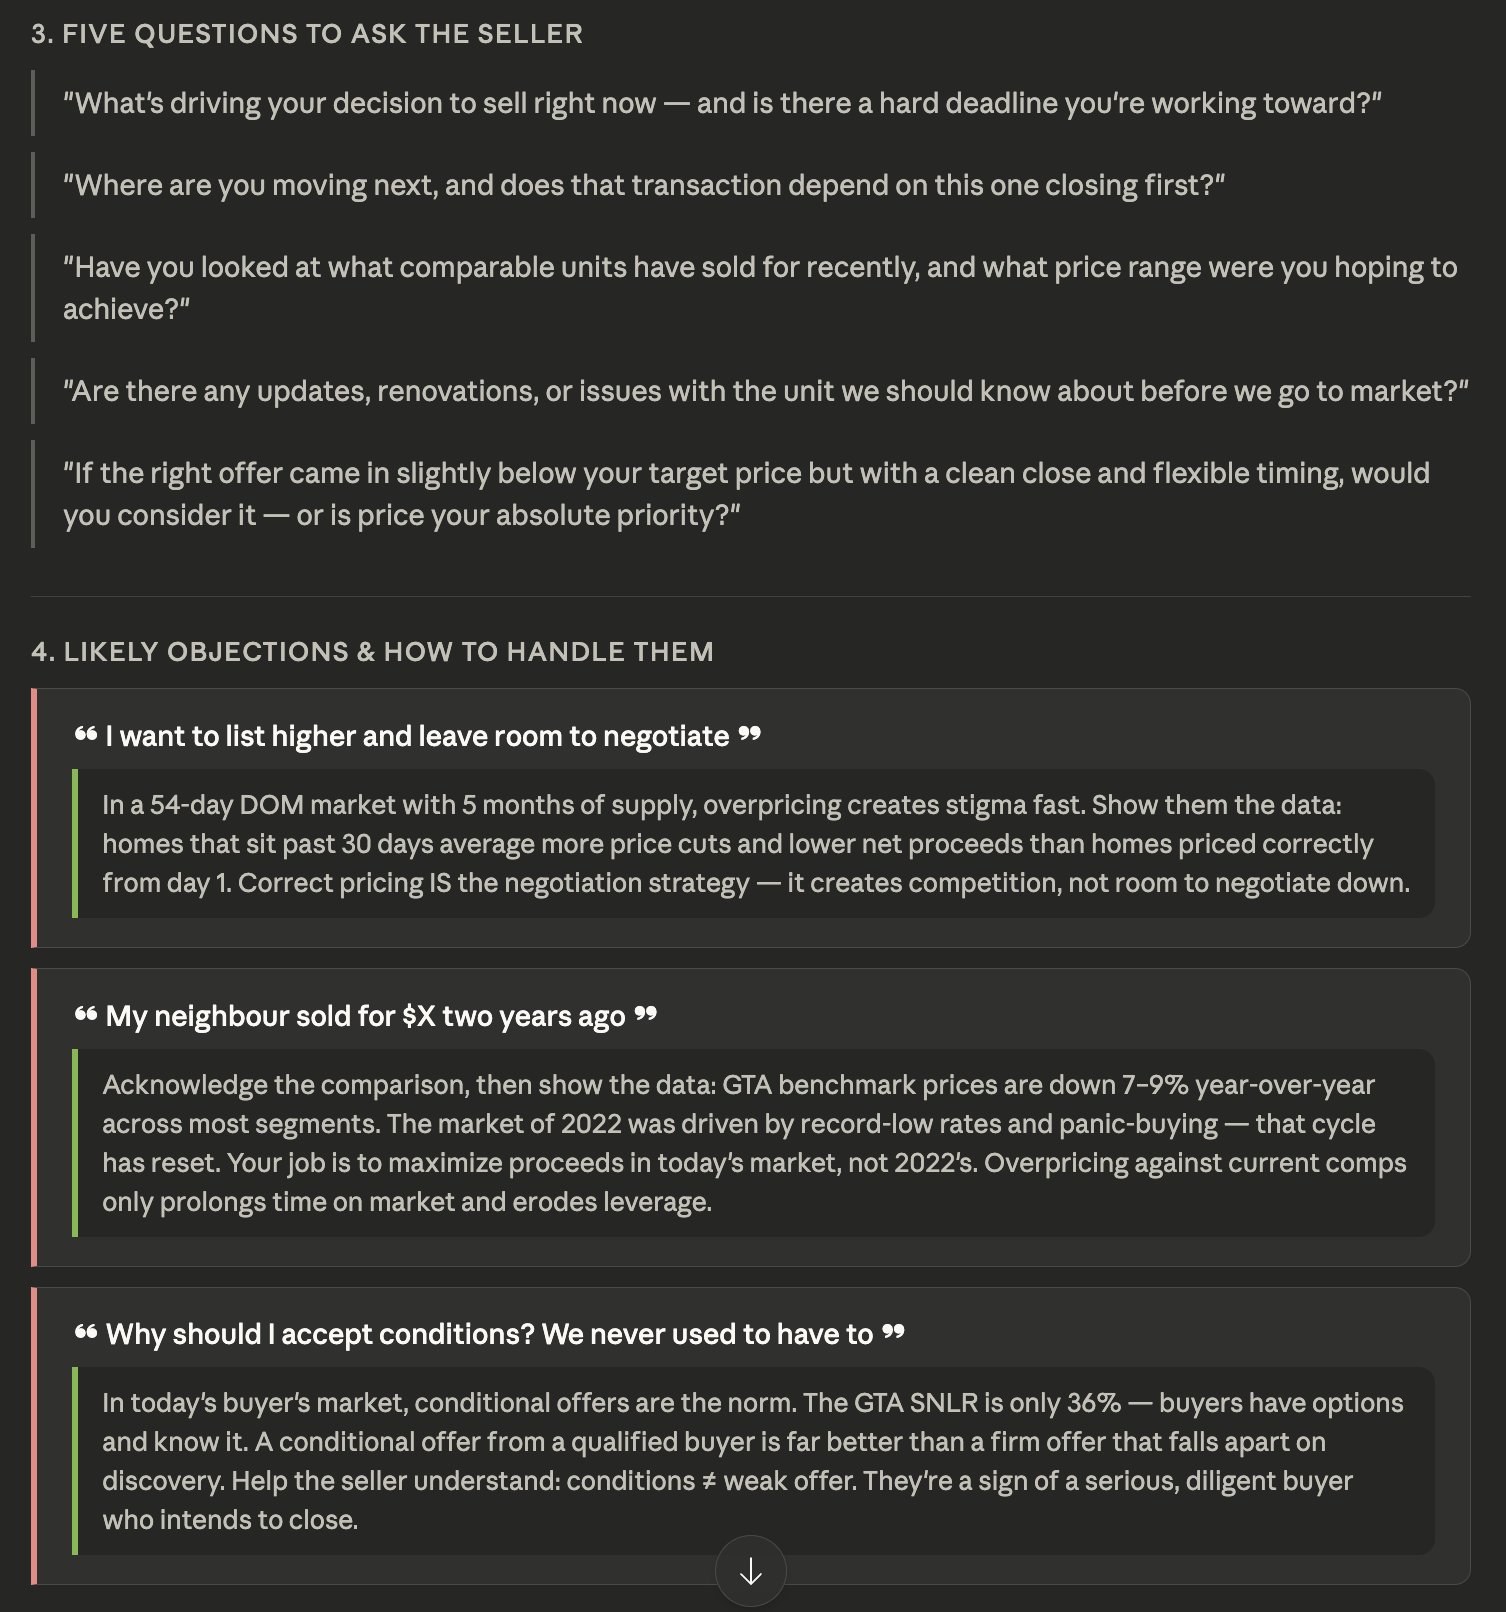
The good information that you can bring is crime statistics and neighborhood highlights as these can really indicate to the seller that you know their area.
Step 3: Save your best prompts. Claude lets you start new conversations, but you can't save prompts natively. As such, keep a running Google Doc of the prompts that produce the most useful outputs for your specific situations. Share it with your team.
The problem: A contact form is not a lead capture tool. It's a waiting room. Either they ask for too much data and the lead bounces or they don't ask for enough and you have to manually qualify them.
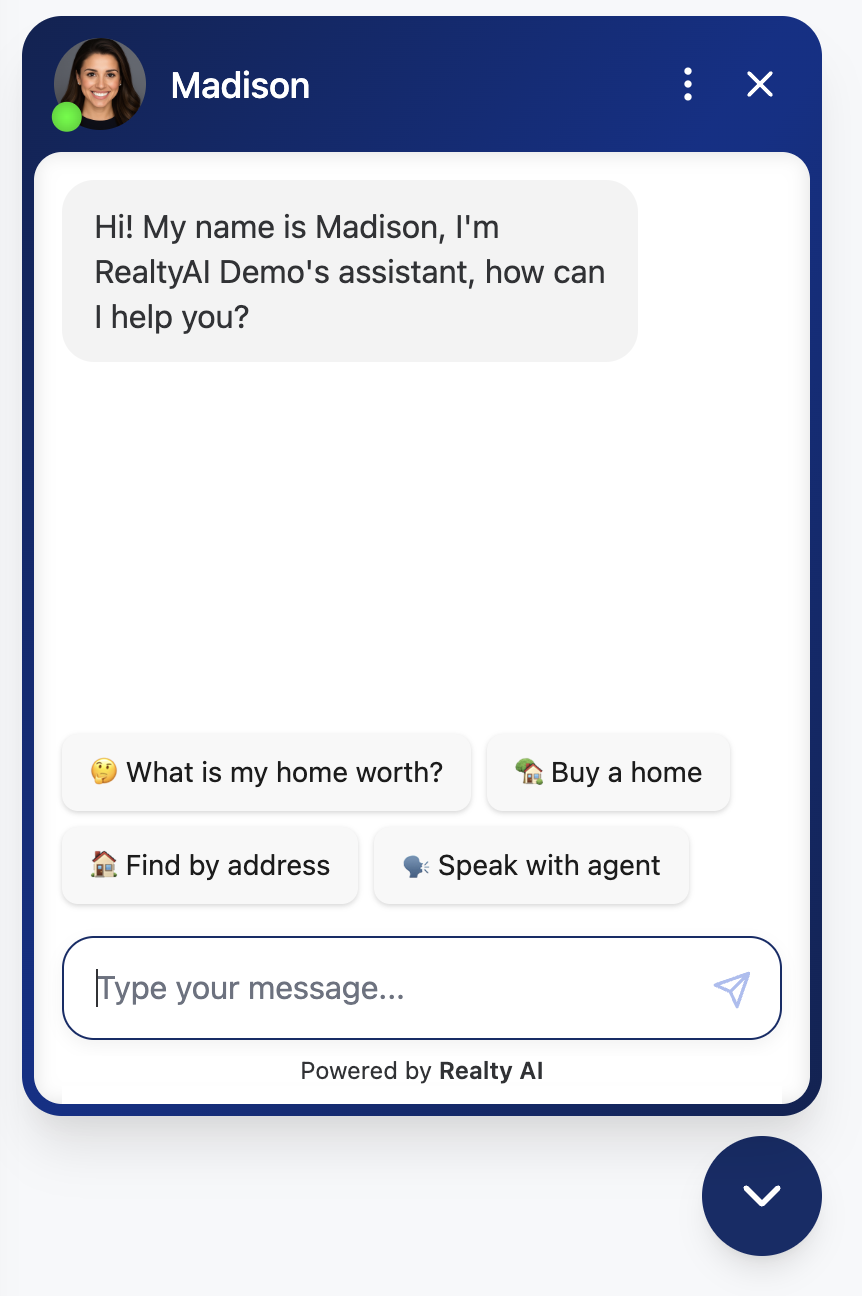
The fix: Realty AI's Madison engages every visitor the moment they arrive She starts a real conversation, qualifies the lead through dialogue the way a skilled agent would, and ensures your team has what they need to make a meaningful follow-up call within five minutes.
{{CASESTUDY}}
The Realty AI assistant offers a "set it and forget it" solution that works continuously in the background. Once configured, your AI chatbot operates around the clock without requiring daily management or oversight.
Step 1: Paste the embed code on your website. When you sign up, you receive an embed code by email. That's it. Paste it into your website's body section. We have embedding instructions found here.
Madison is live on your site immediately. Out of the box she's already trained on real estate data, knows how to handle buyer and seller questions, talk through the process, and capture contact information without any additional configuration from you.
Step 2 (optional): Custom configuration and CRM integration. The default setup works. But if you want Madison to reflect your team's specific market, agent names, neighborhoods, or route leads directly into your CRM you can modify this in our custom dashboard.
Custom configuration lets you define:
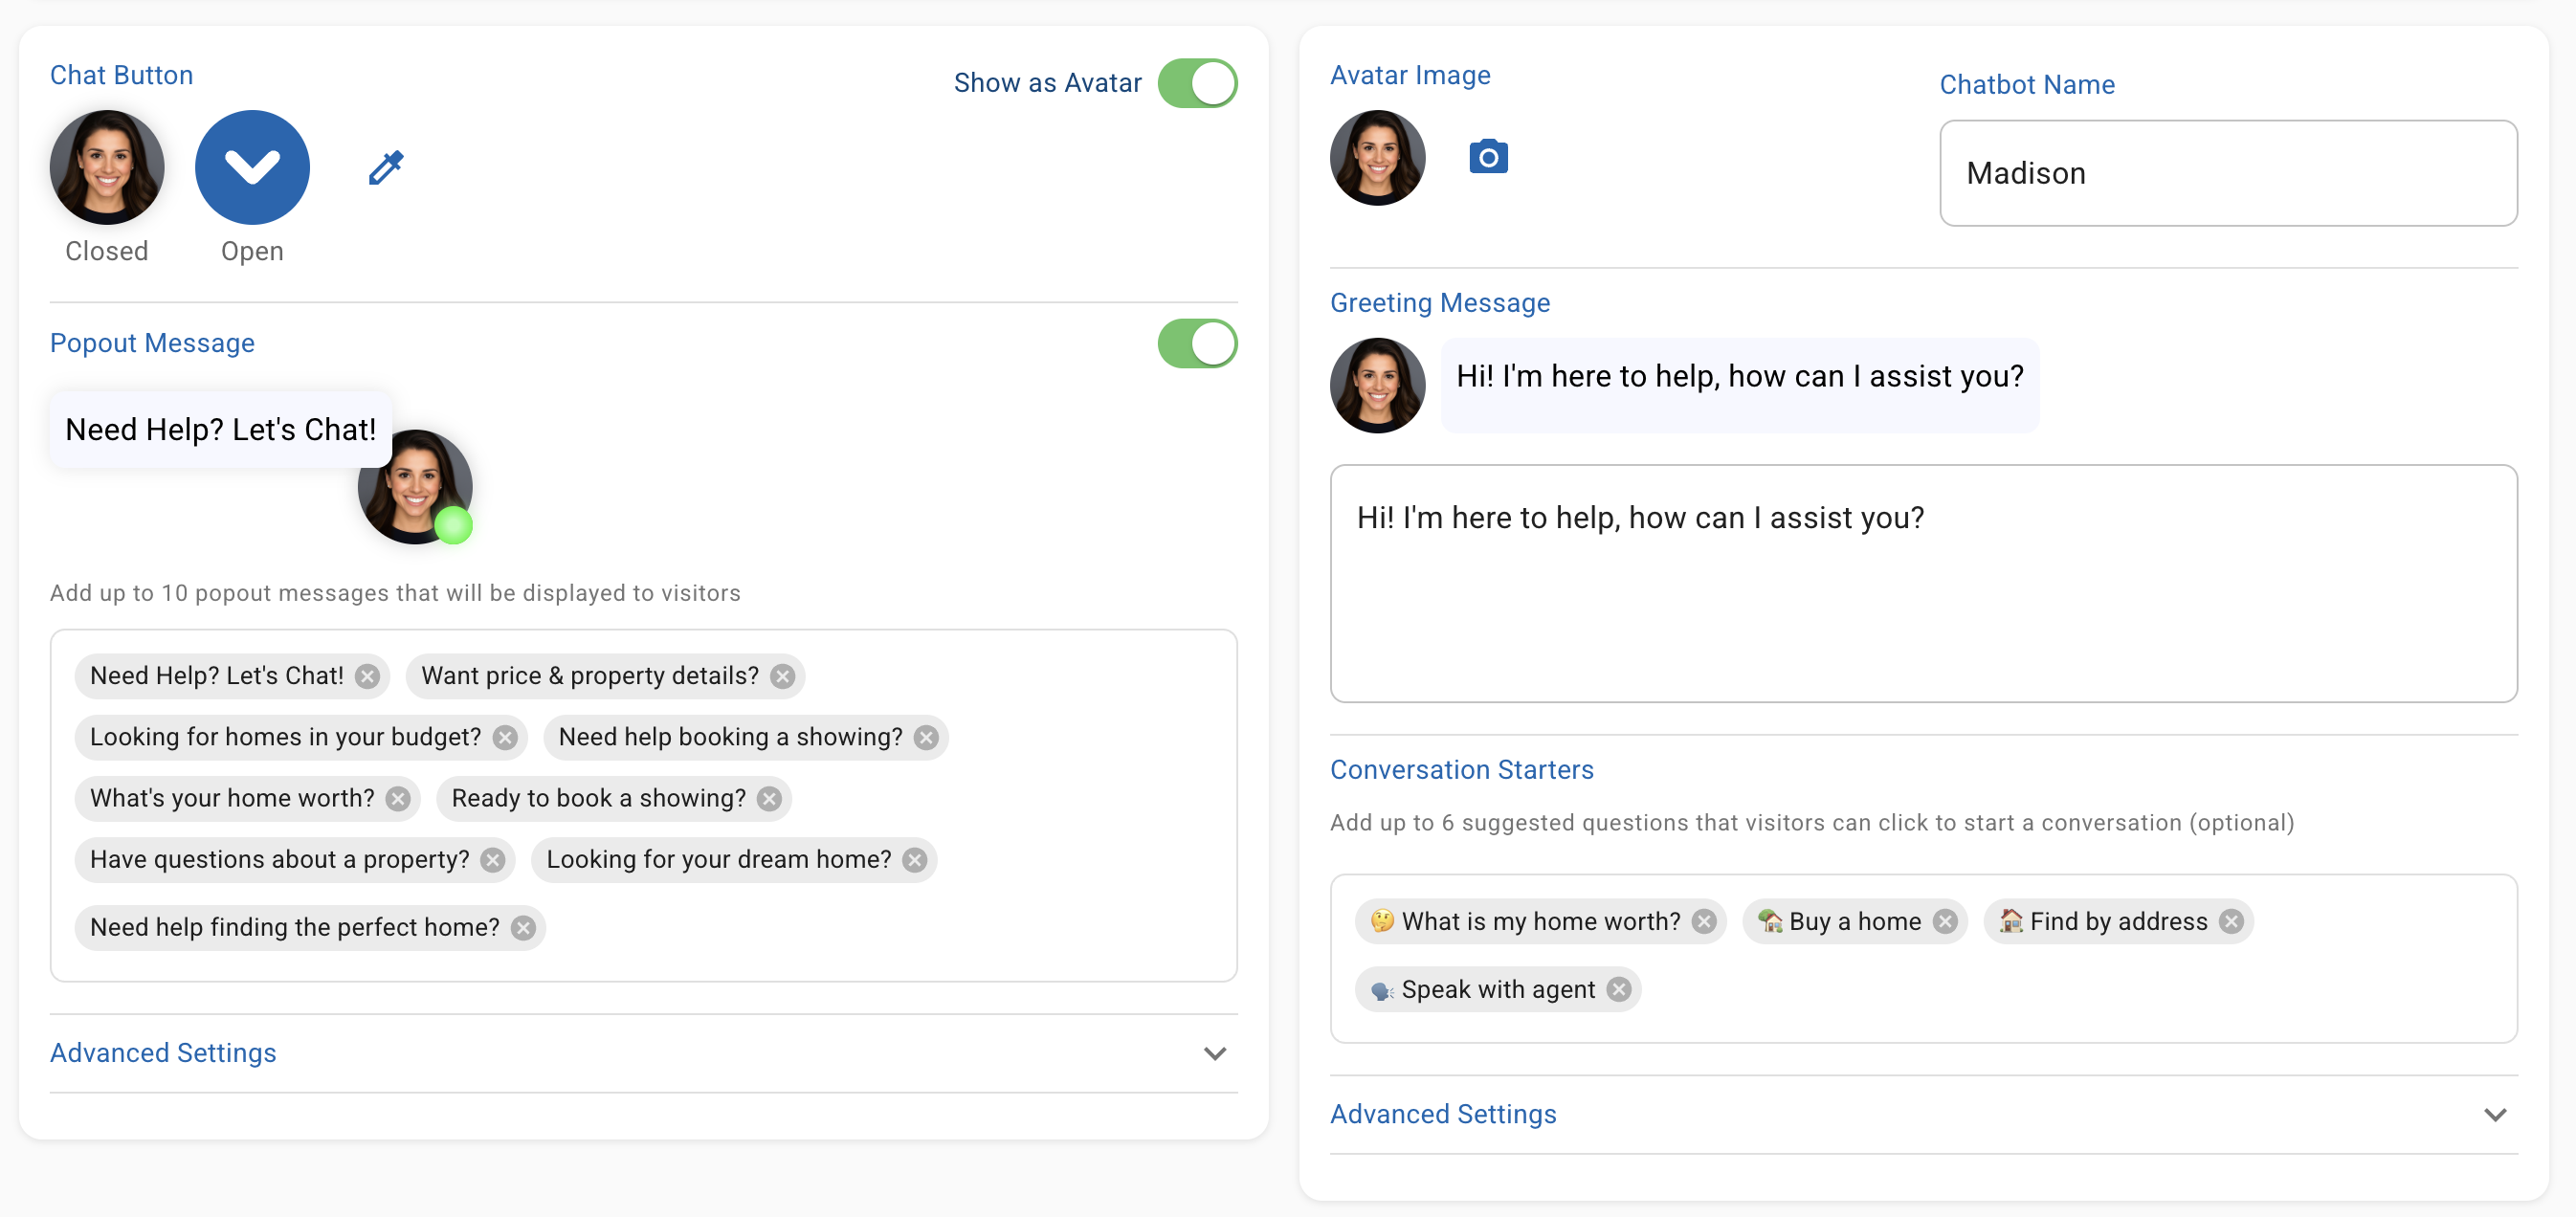
During configuration, you can provide a description of each service and, optionally, a URL to a page on your website where that service is explained. This is where Madison gets genuinely tailored to your business as she reads that content and uses it to inform her responses.
Examples of what teams add here:

To get started you can book a meeting with our team here
{{CALENDAR}}
The problem: Your team's social presence goes dark every time the market picks up because writing content from scratch competes with everything else on an agent's plate. And generic posts that could have been written by anyone don't build an audience anyway.
The fix: Jasper is an AI writing platform built specifically to help you with content marketing. What sets it apart from a general AI tool is its Brand Voice feature. You train it once on your team's tone and market focus, and every piece of content it produces sounds like you.
Step 1: Go to jasper.ai and start a free trial. Jasper's Creator plan ($49/month) handles everything a real estate team needs — Brand Voice, templates, and one-click campaign generation.
Step 2: Set up your Brand Voice. In Jasper, during onboarding you can provide a webpage that includes the brand voice that you use. They will analyze it and convert it into a brand kit that you can later customize and change.
Step 3: Use the Campaigns feature to generate a month of content at once. Click Campaigns → Create Campaign. Enter:
Step 4: Review every post before it goes anywhere. Jasper gets the structure and tone right. Your job is to inject one specific local detail into each post such as a real stat from your MLS, a neighborhood reference, something from an actual transaction. Posts that include a real local data point outperform generic ones significantly. Don't skip this step.
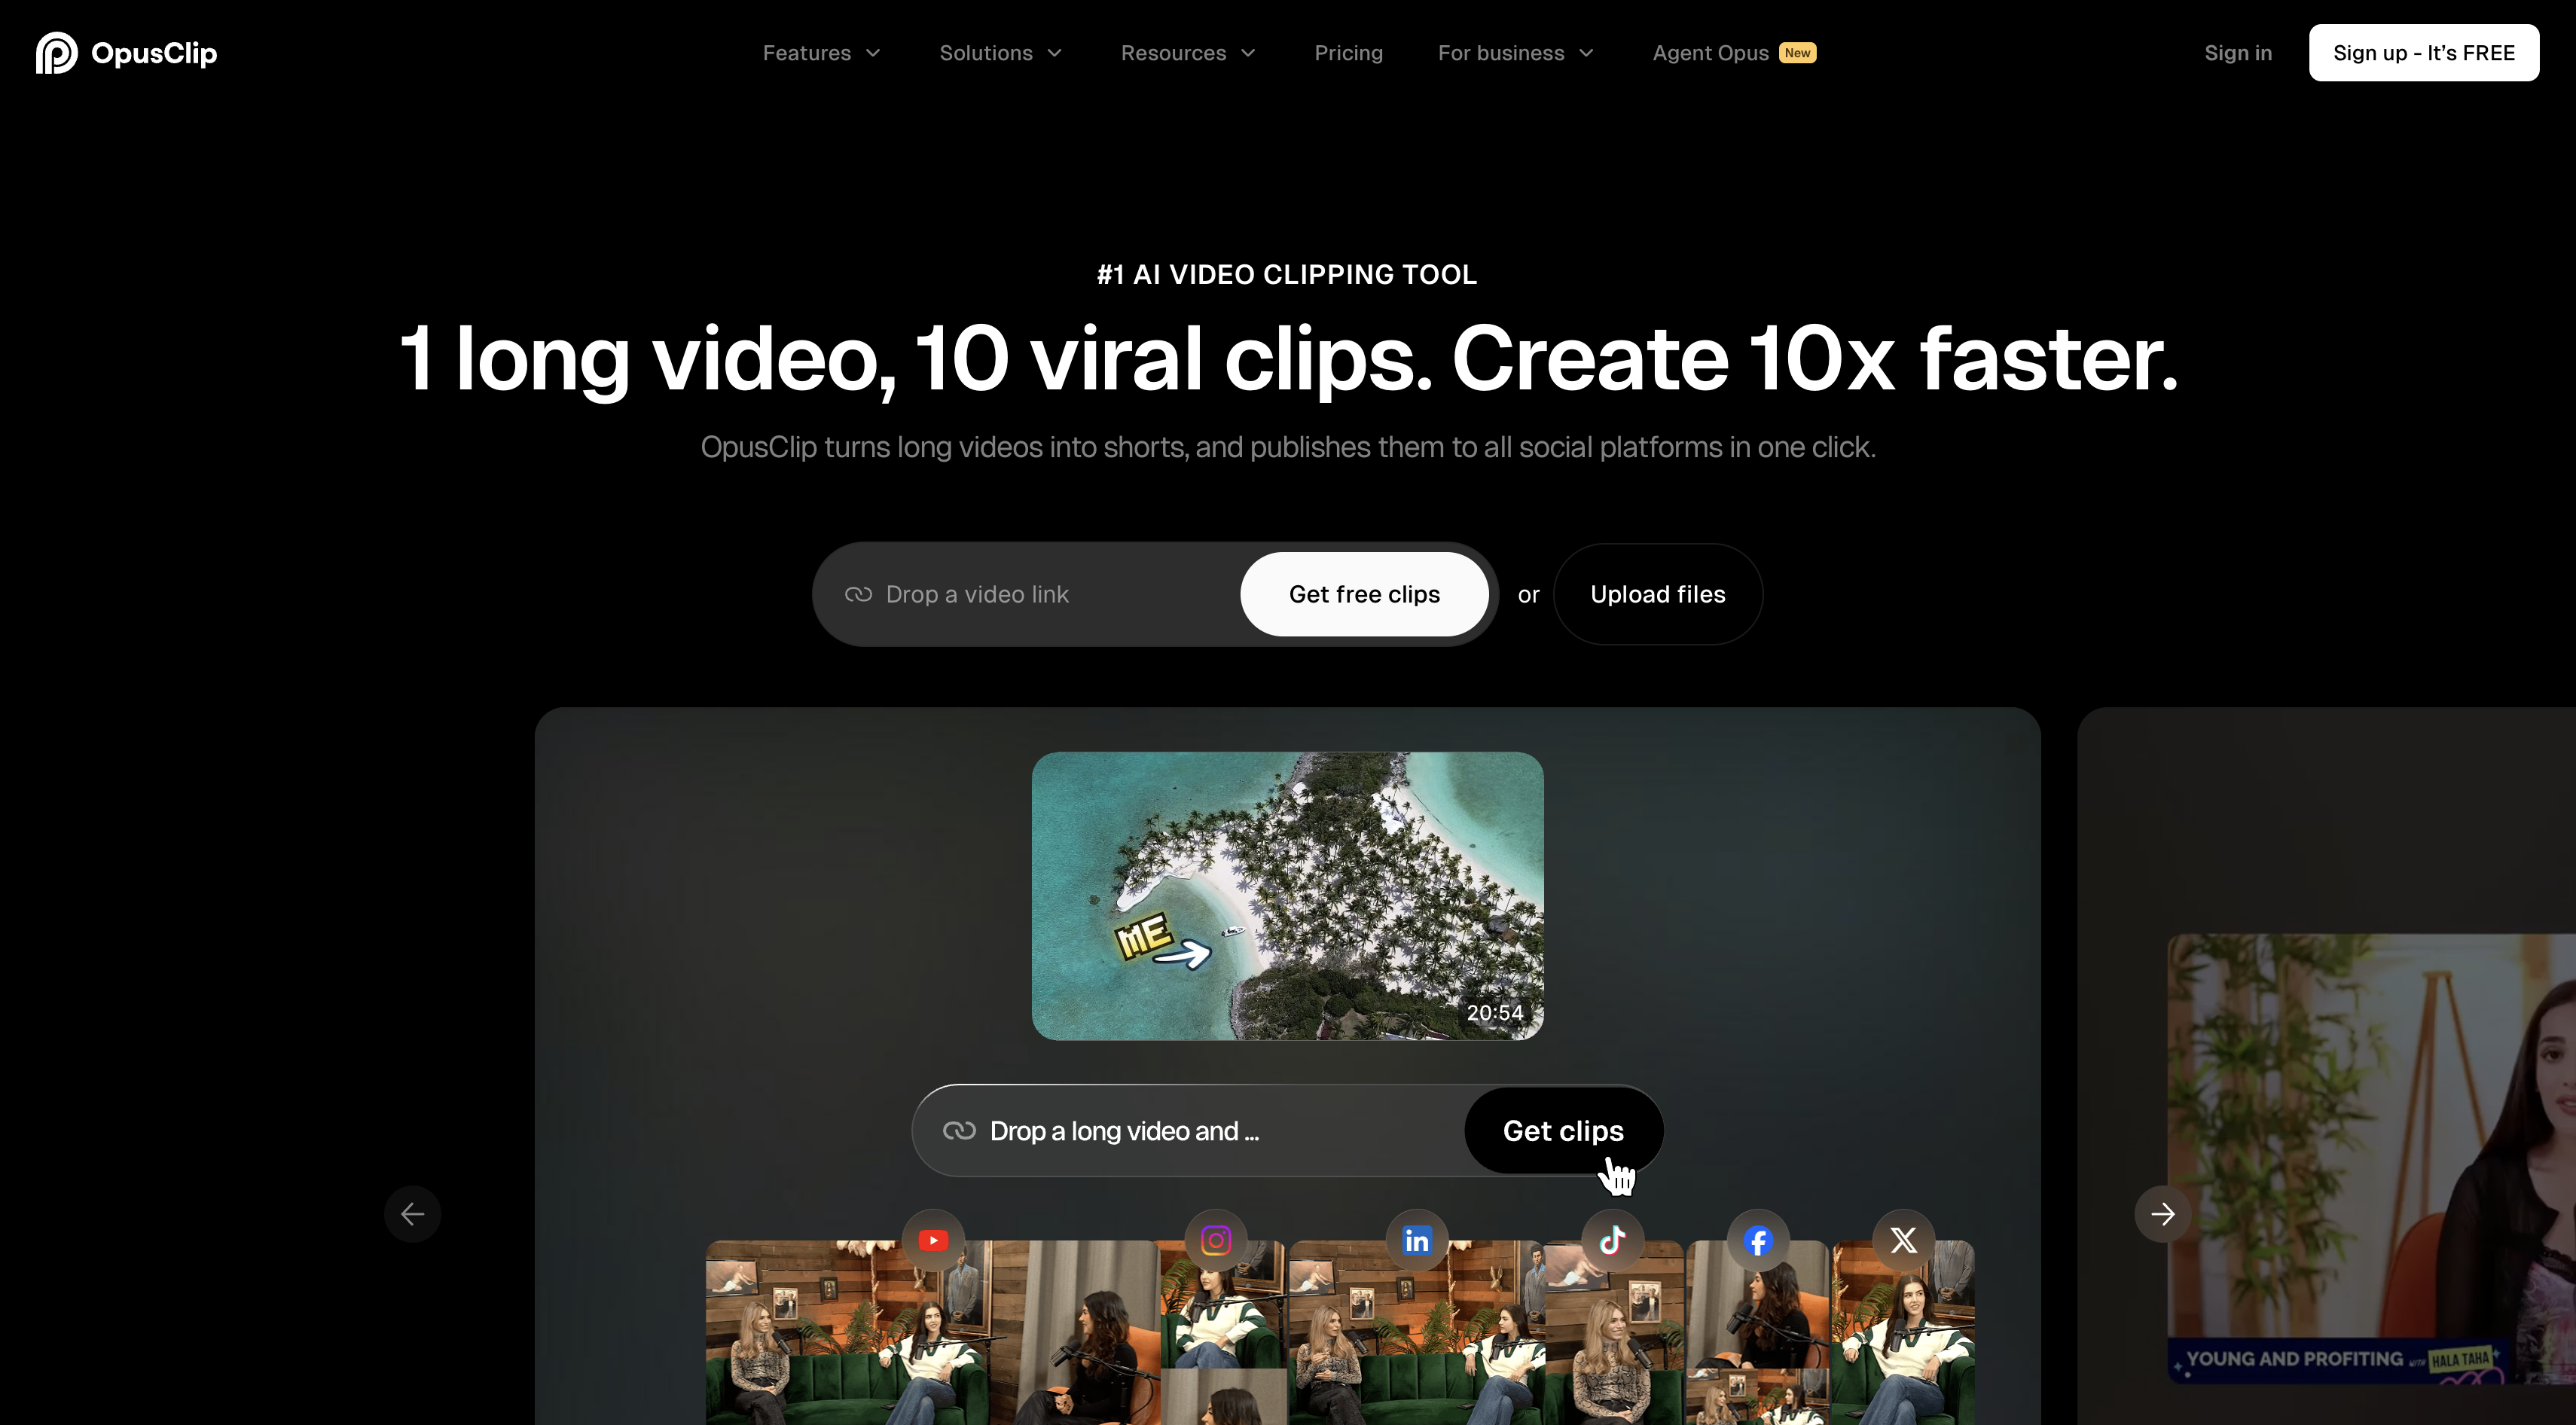
The problem: Every agent knows they should be posting video. Almost none of them do it consistently due to the time commitment.
The fix: Opus Clip takes a long-form video you've already recorded such as a listing walkthrough, a market update or a Q&A and automatically clips it into short-form content ready to post. This makes your video marketing strategy significantly more effective.
How To Get Started:
Step 1: Record one long-form video per week. This is the only step that requires your agents. Some workable content includes:
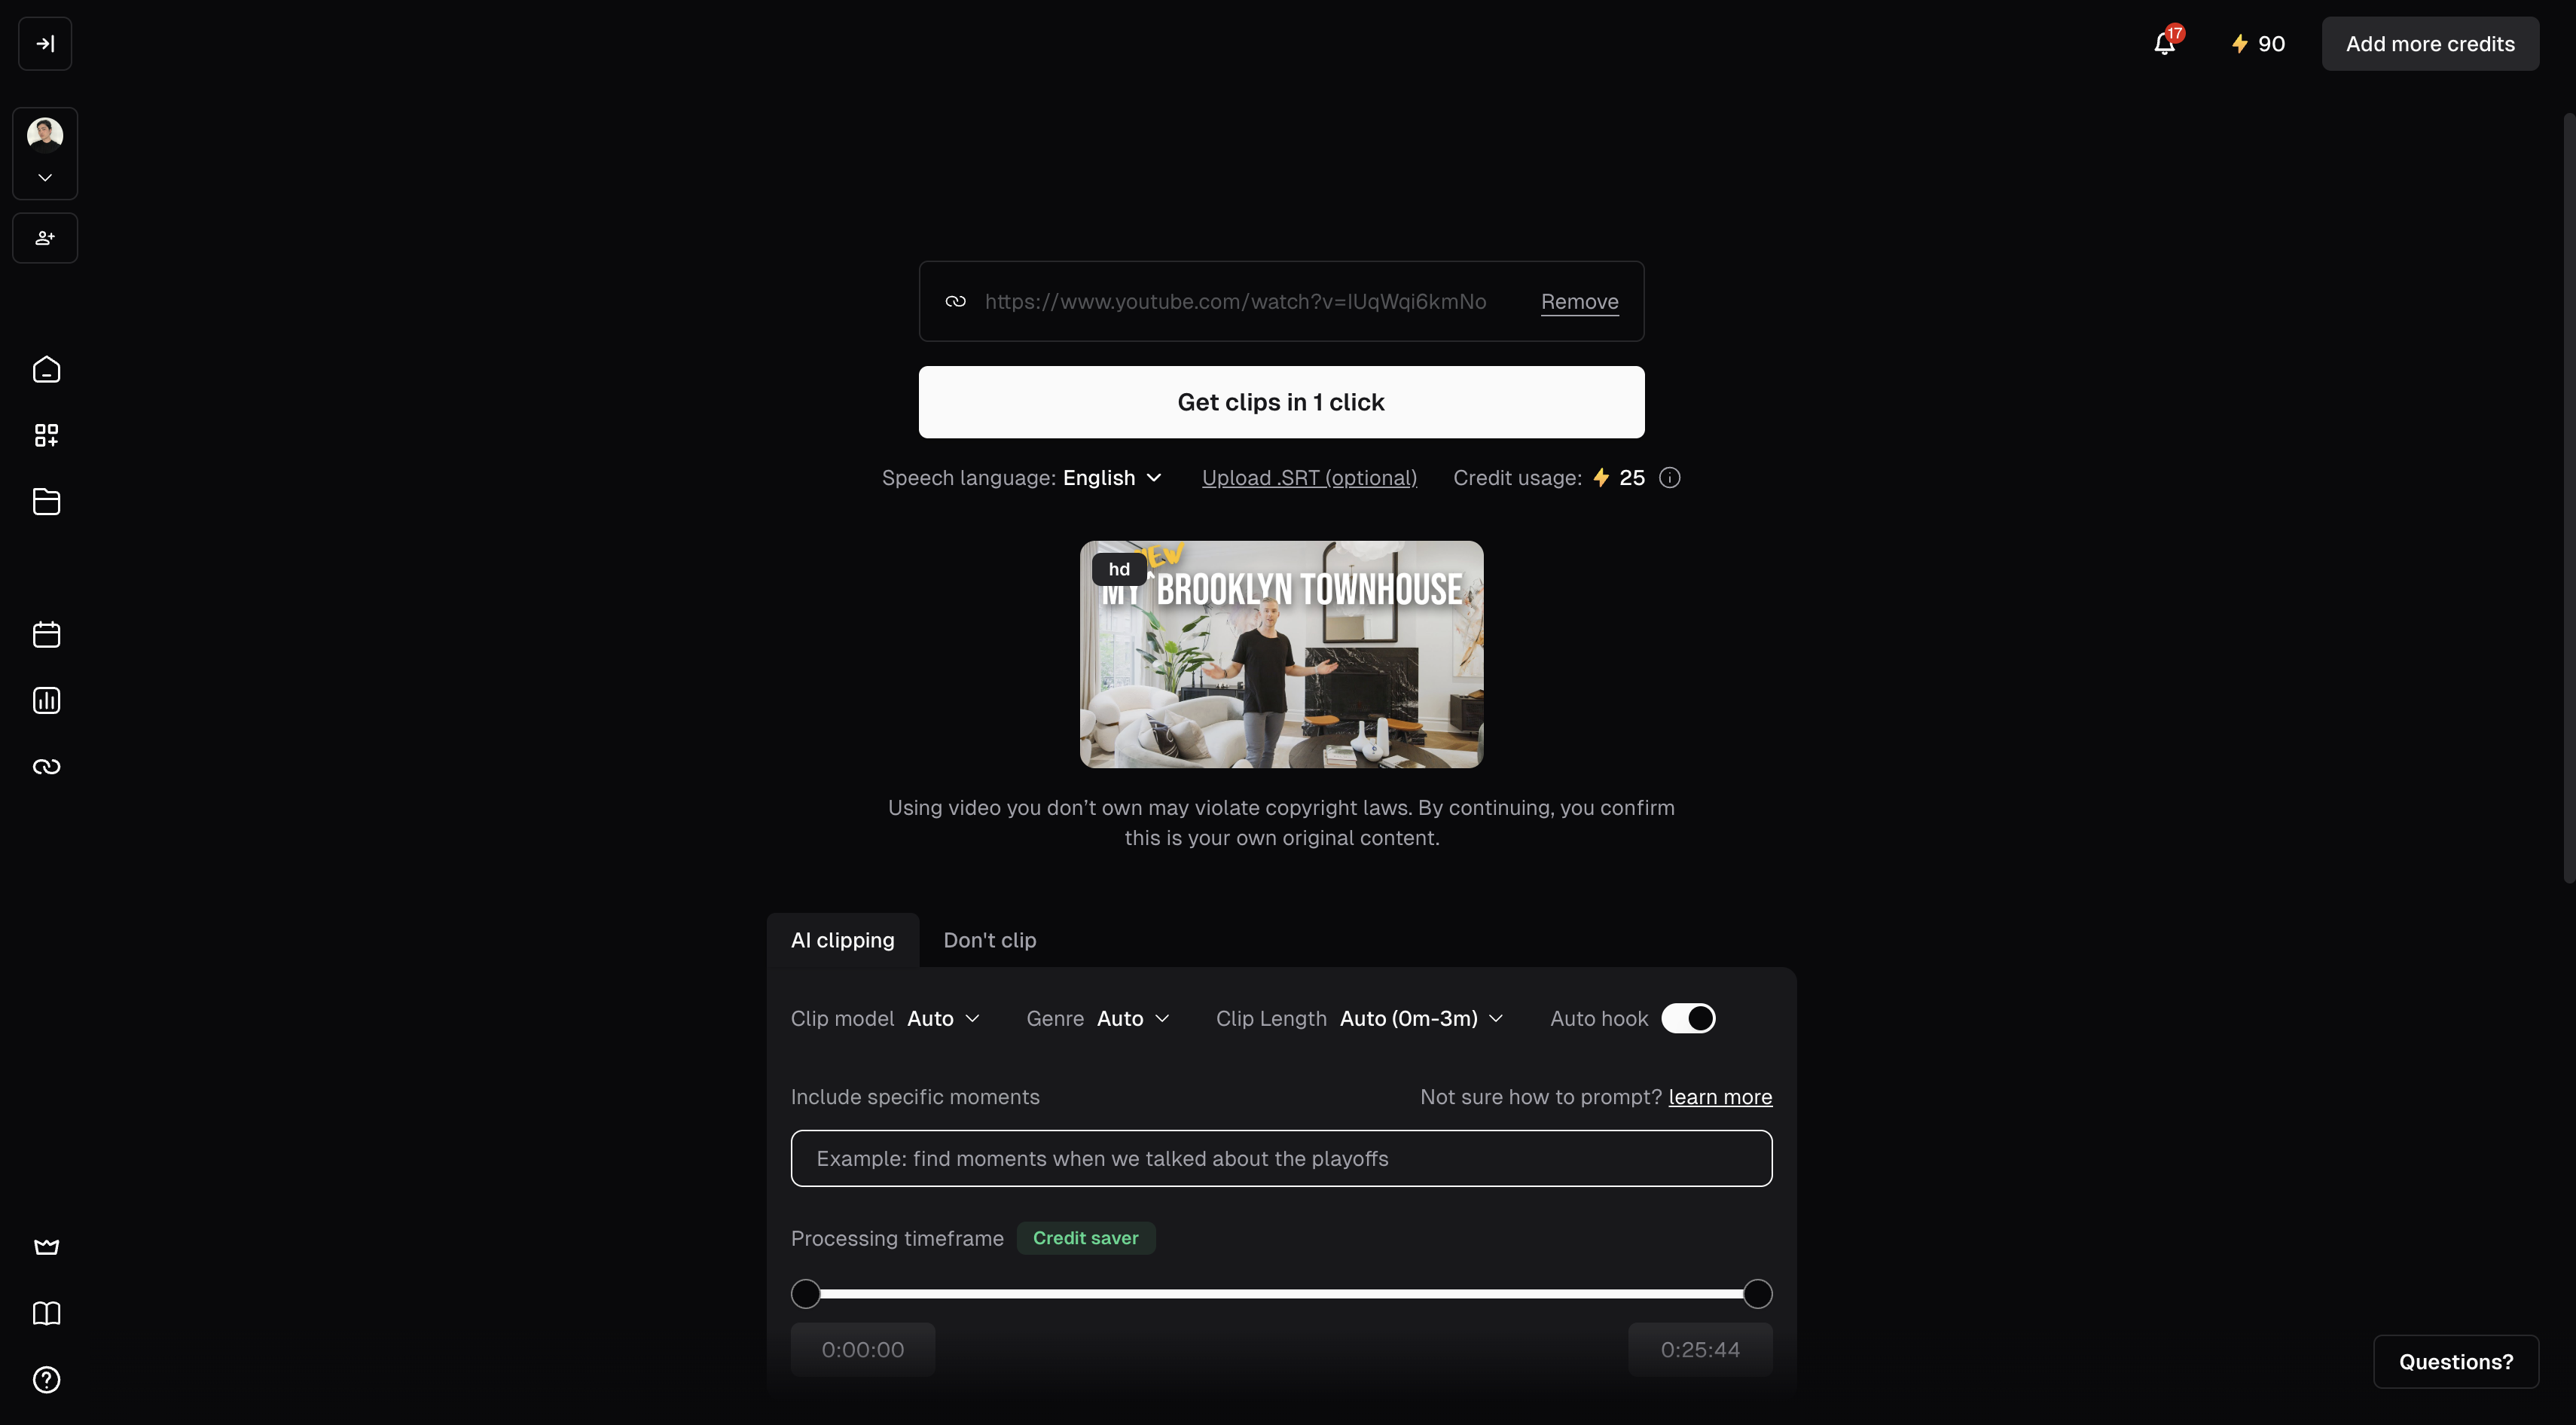
Step 2: Go to opus.pro and create an account. Opus Clip's Starter plan is free for up to 60 minutes of uploads per month. The Pro plan at $19/month removes limits and unlocks better AI clip selection.
Only upgrade when you see the value for your team otherwise it adds another monthly cost you will need to manage
Step 3: Upload your video as a URL and let Opus Clip process it. The AI watches the full video, identifies the most engaging segments based on speech patterns, topic changes, and audience retention signals, then generates clips automatically.
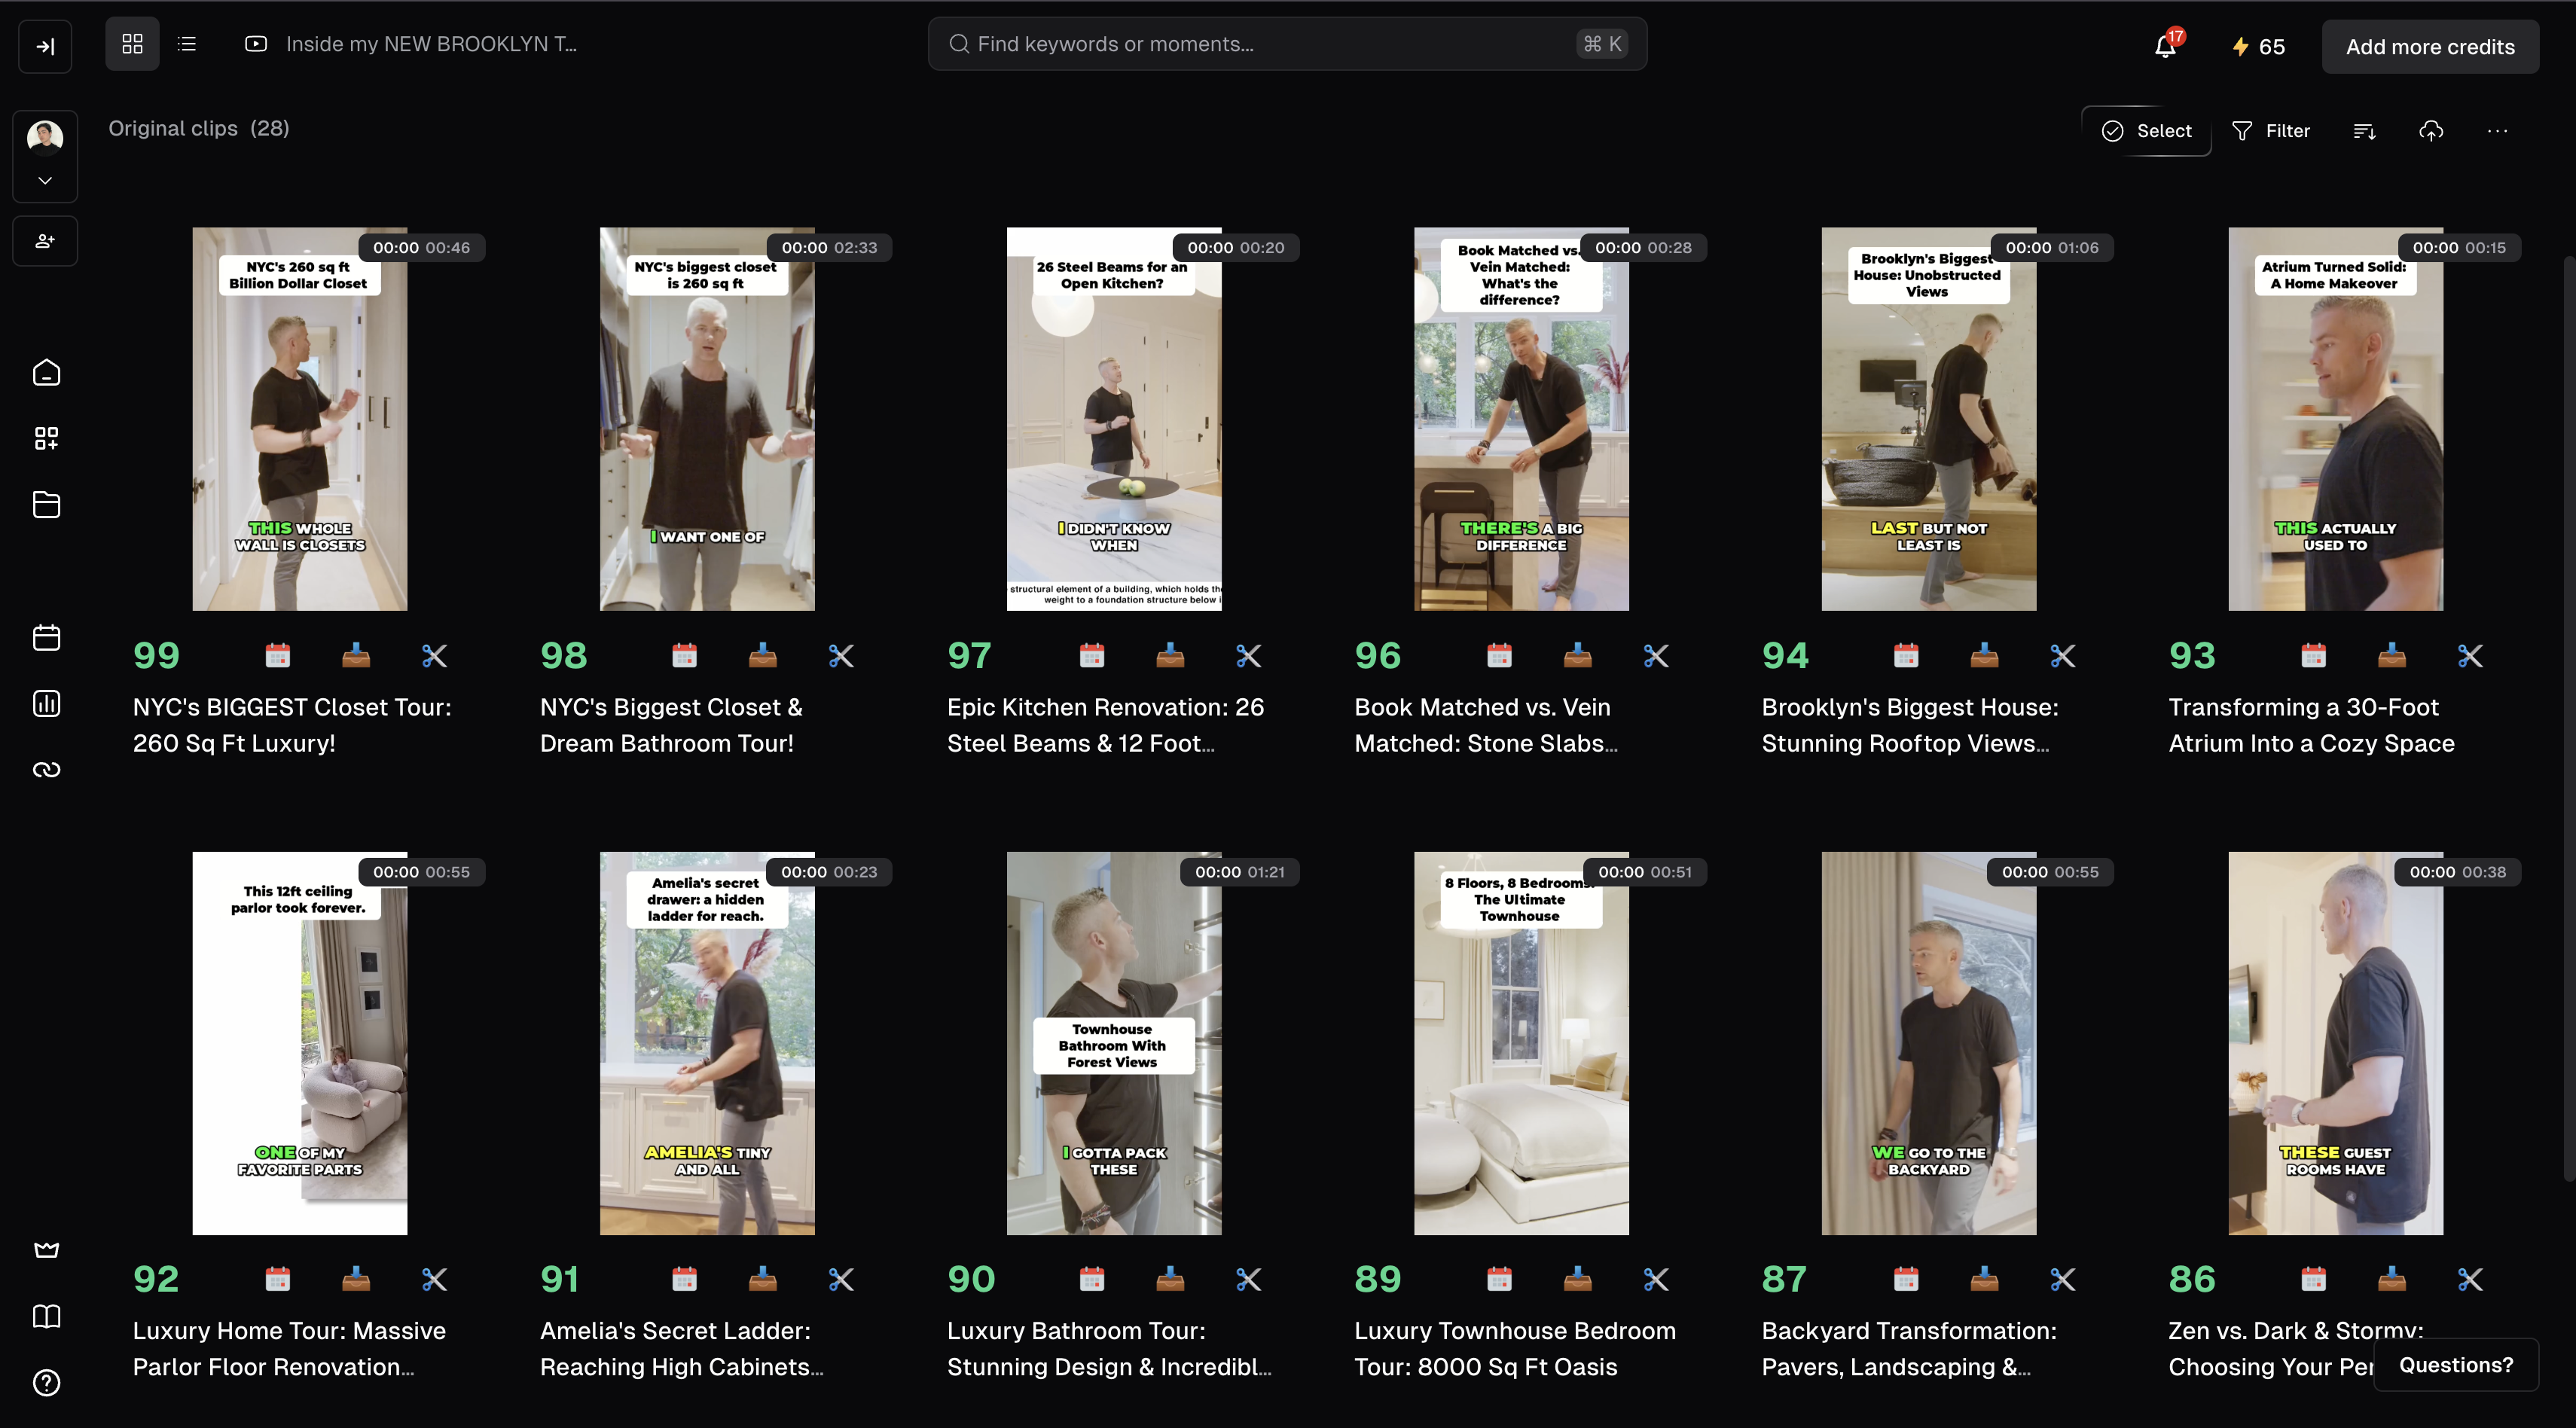
For a 10-minute video, you'll get 6 to 10 clips ranging from 30 seconds to 2 minutes.
Step 4: Review the clips and pick the best three to five. Opus Clip shows you each clip with an engagement score. This score is a prediction of how likely it is to perform on short-form platforms. Start with the highest-scored ones.
Watch each clip through and answer the following questions:
1. Does it open with something compelling?
2. Does it make sense without the context of the full video?
Step 5: Export with captions on. The captions on on by default and should stay on. Review them for accuracy before exporting (names, neighborhood names, and market-specific terms occasionally get transcribed incorrectly).
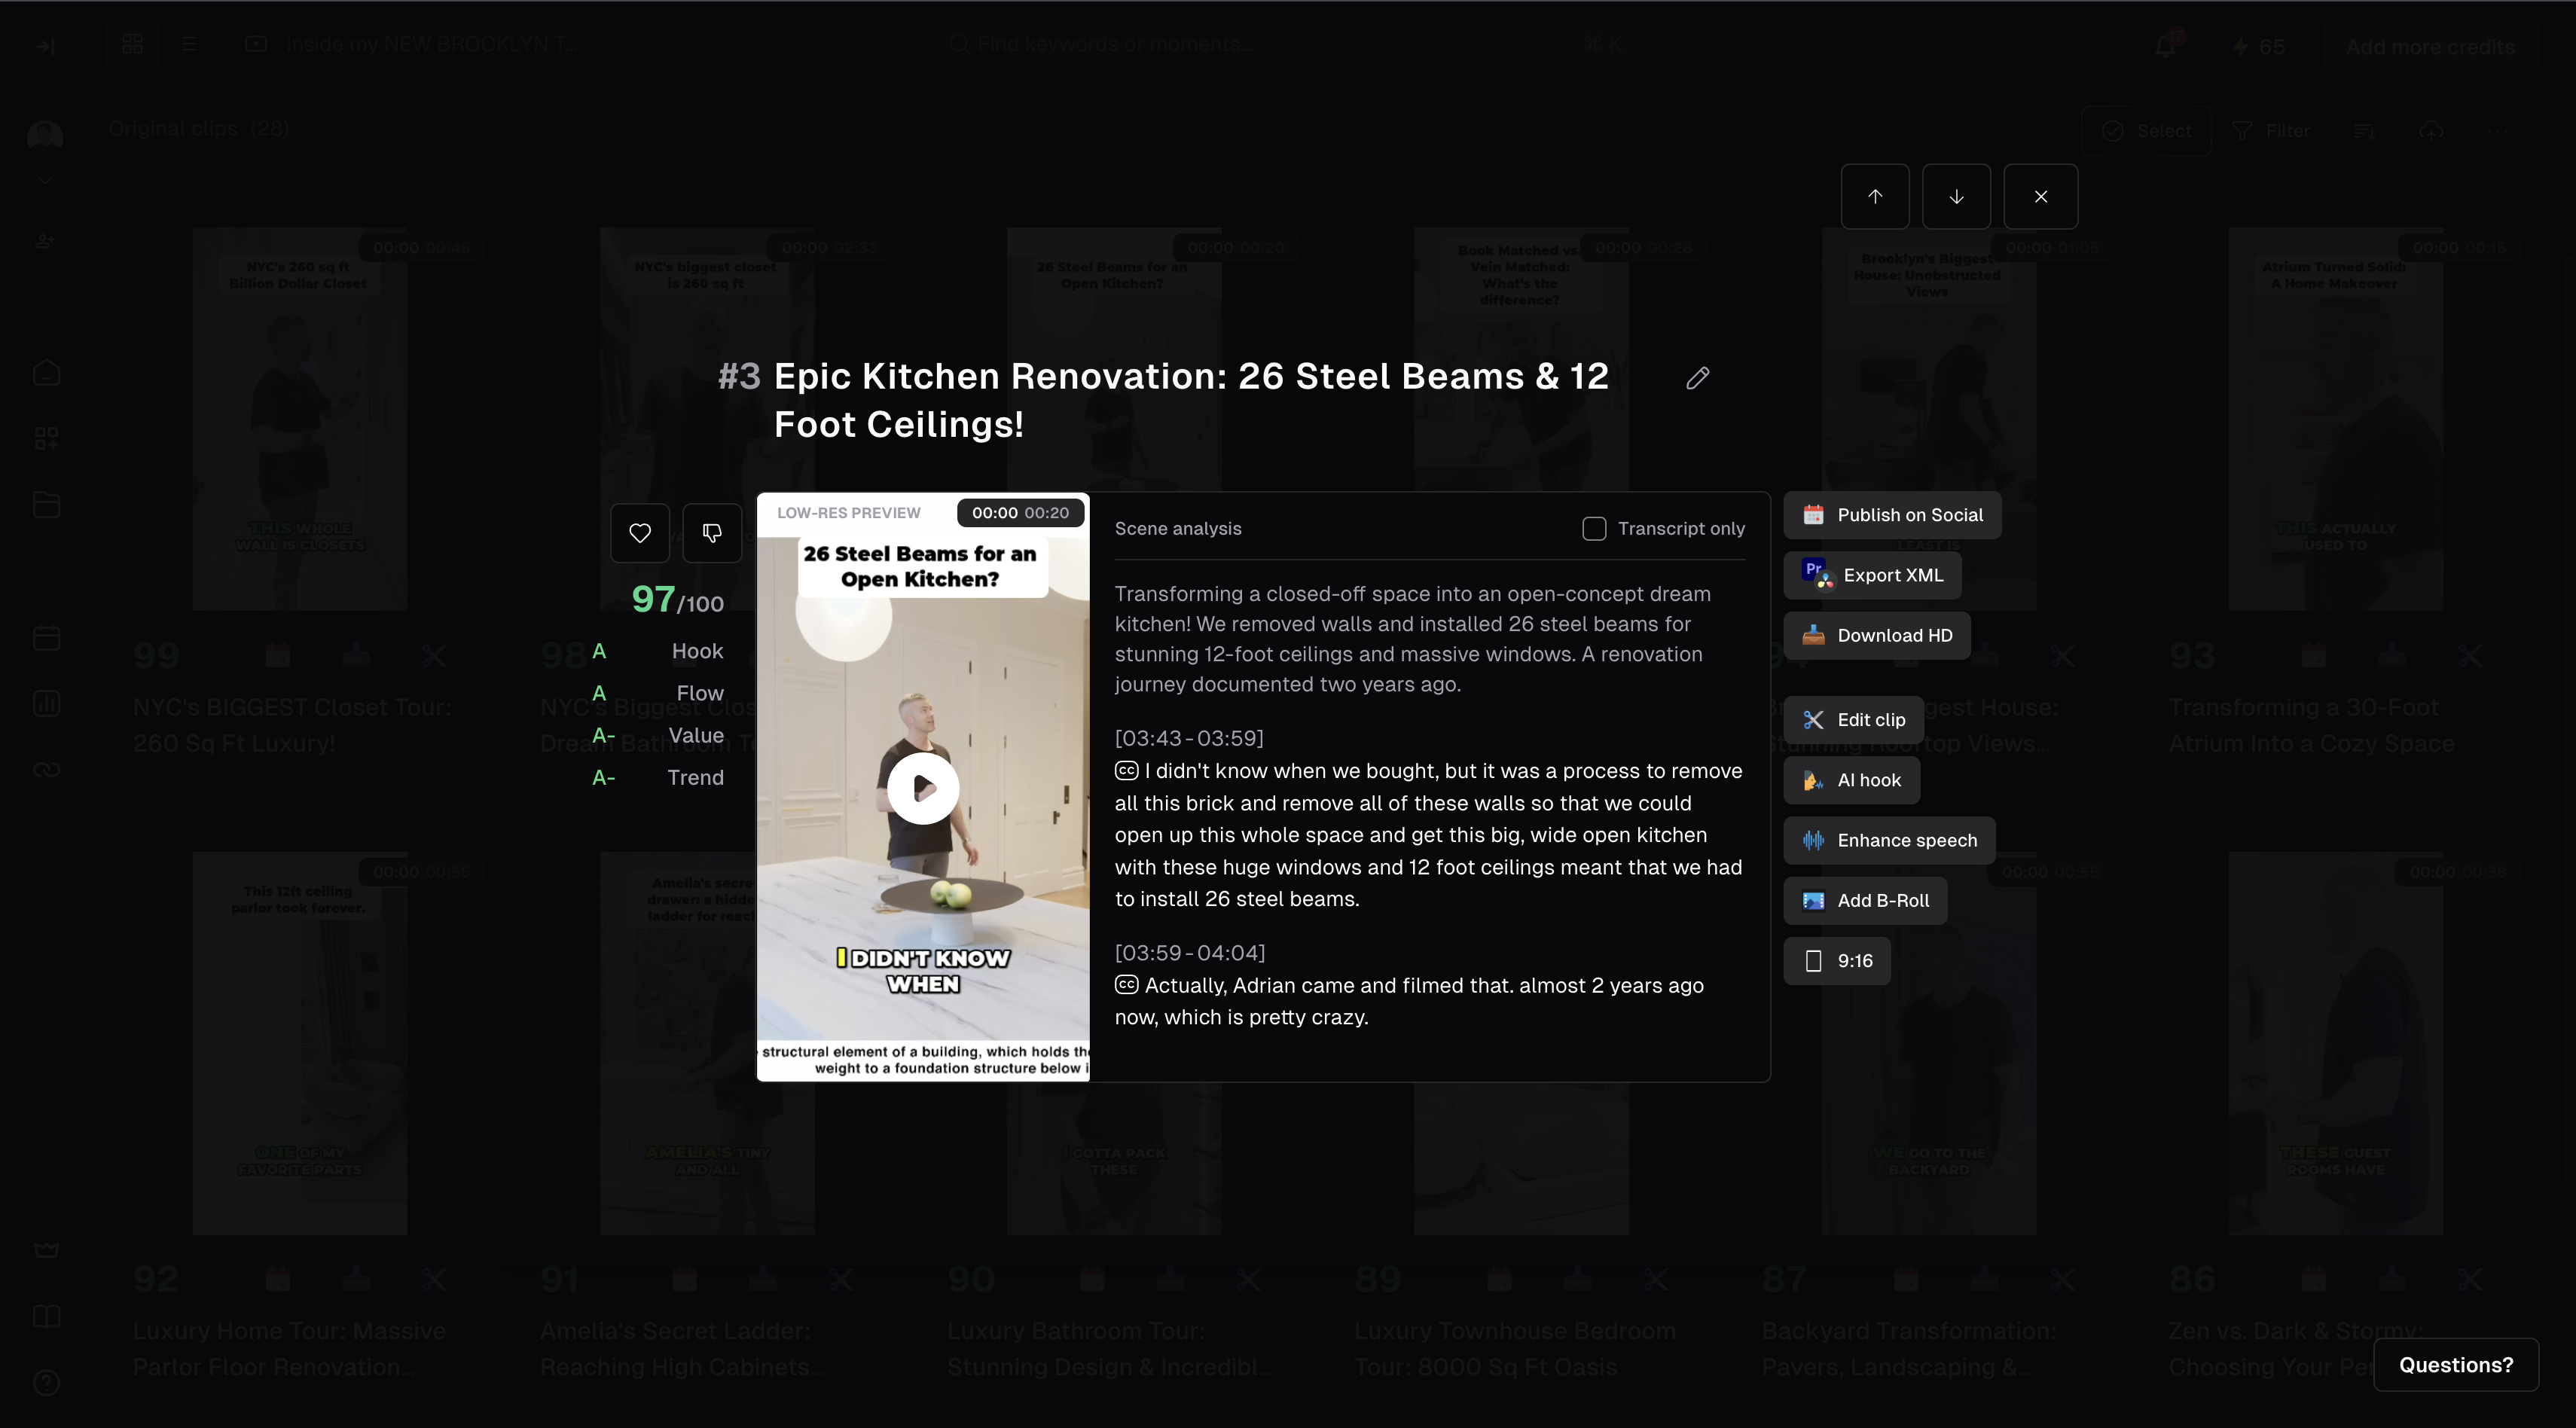
Step 6: Post across platforms directly from Opus Clip or download and post manually. Opus Clip can directly connect to Instagram, TikTok, YouTube Shorts, and LinkedIn.
{{CTA}}
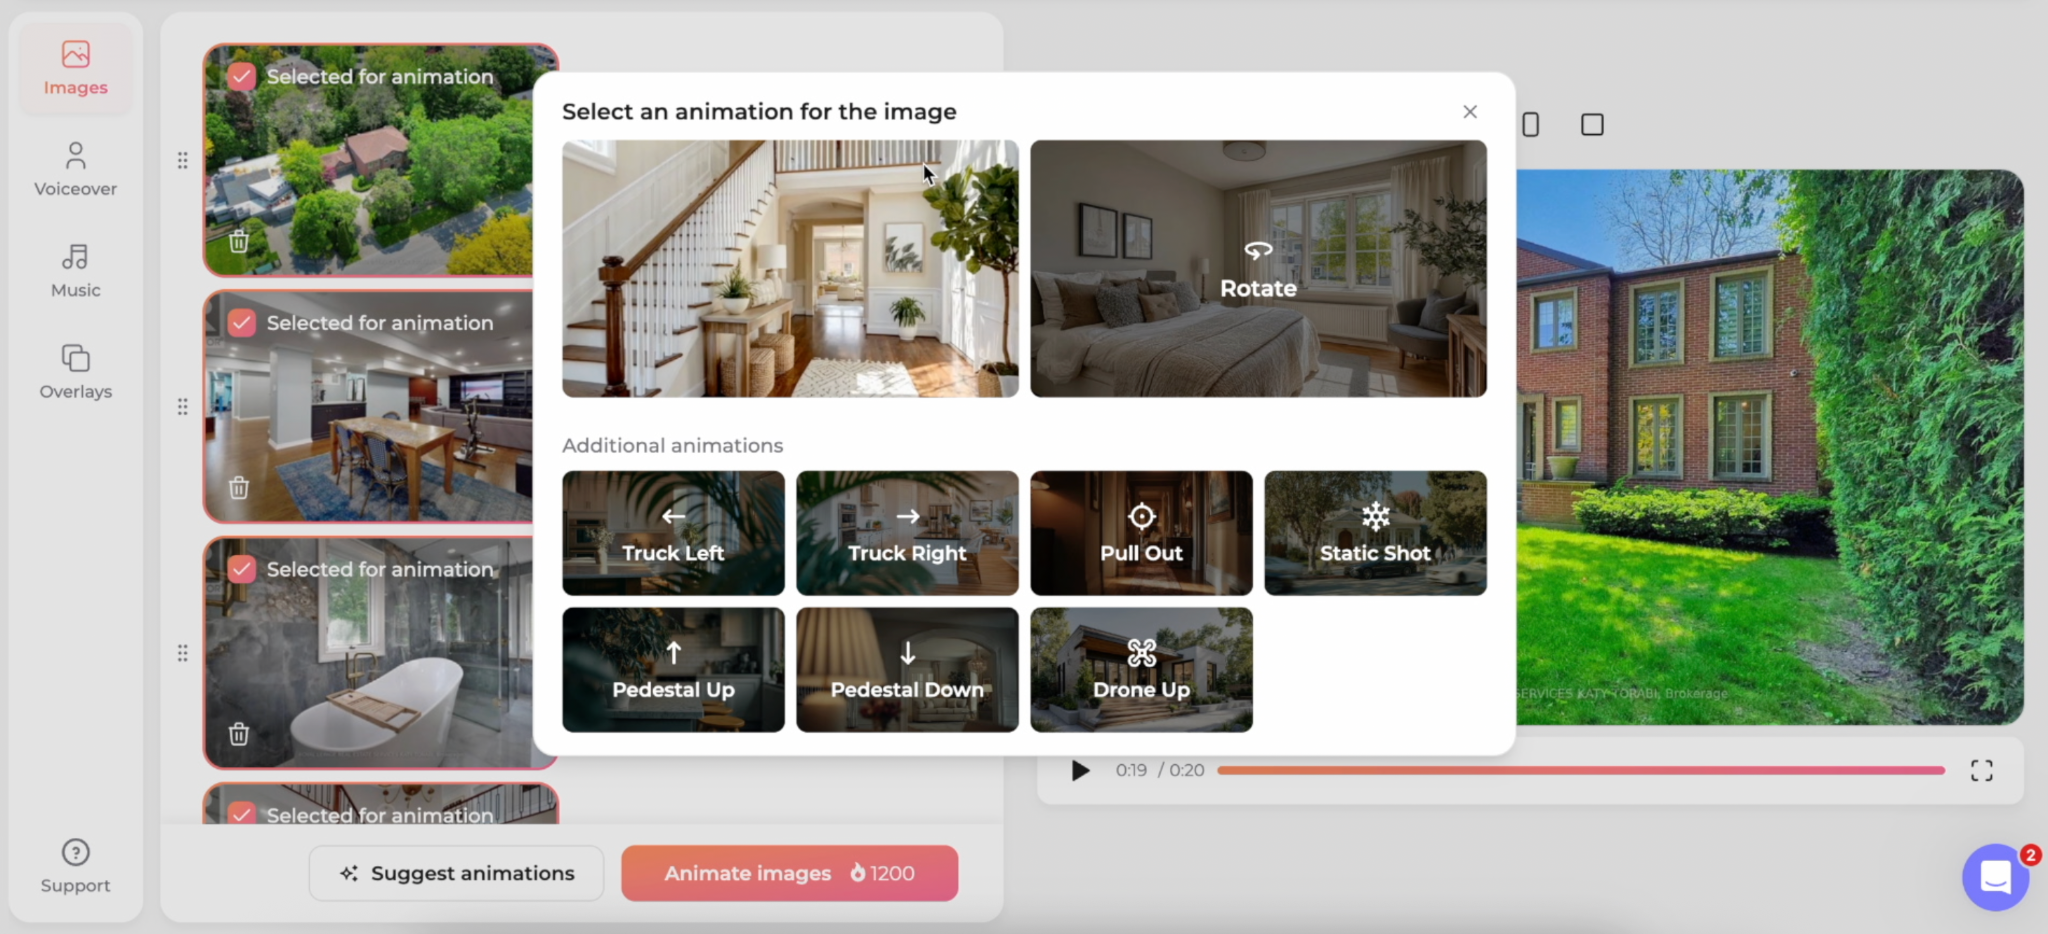
The problem: Buyers scroll past static photos constantly. You need something to draw their attention and stop their scroll.
The fix: Amplify takes your existing listing photos and turns them into a polished, branded property video with professional transitions and music.
Time & ROI: A listing video that would take 2–4 hours to produce manually or $300–$500 to outsource is done in under 10 minutes.
How to get started
Step 1: Have your listing photos ready. Take thesame photos you're already using in the MLS.
Keep in mind that better photos produce better videos so a good photographer is worth their weight in gold.
Step 2: Go to amplifies.ai and create an account. Amplify is built for real estate marketing — the platform understands listing content and doesn't require any design configuration to get started.

Step 3: Create a new project and upload your photos. Drag and drop your listing images in the order you want them to appear. Amplify uses this sequence as the video structure so lead with exterior shots, move through the main living areas then end with the backyard.
Step 4: Select your music and branding preferences. Amplify offers a library of licensed music tracks sorted by mood and energy. Choose something that matches the price point and feel of the property.
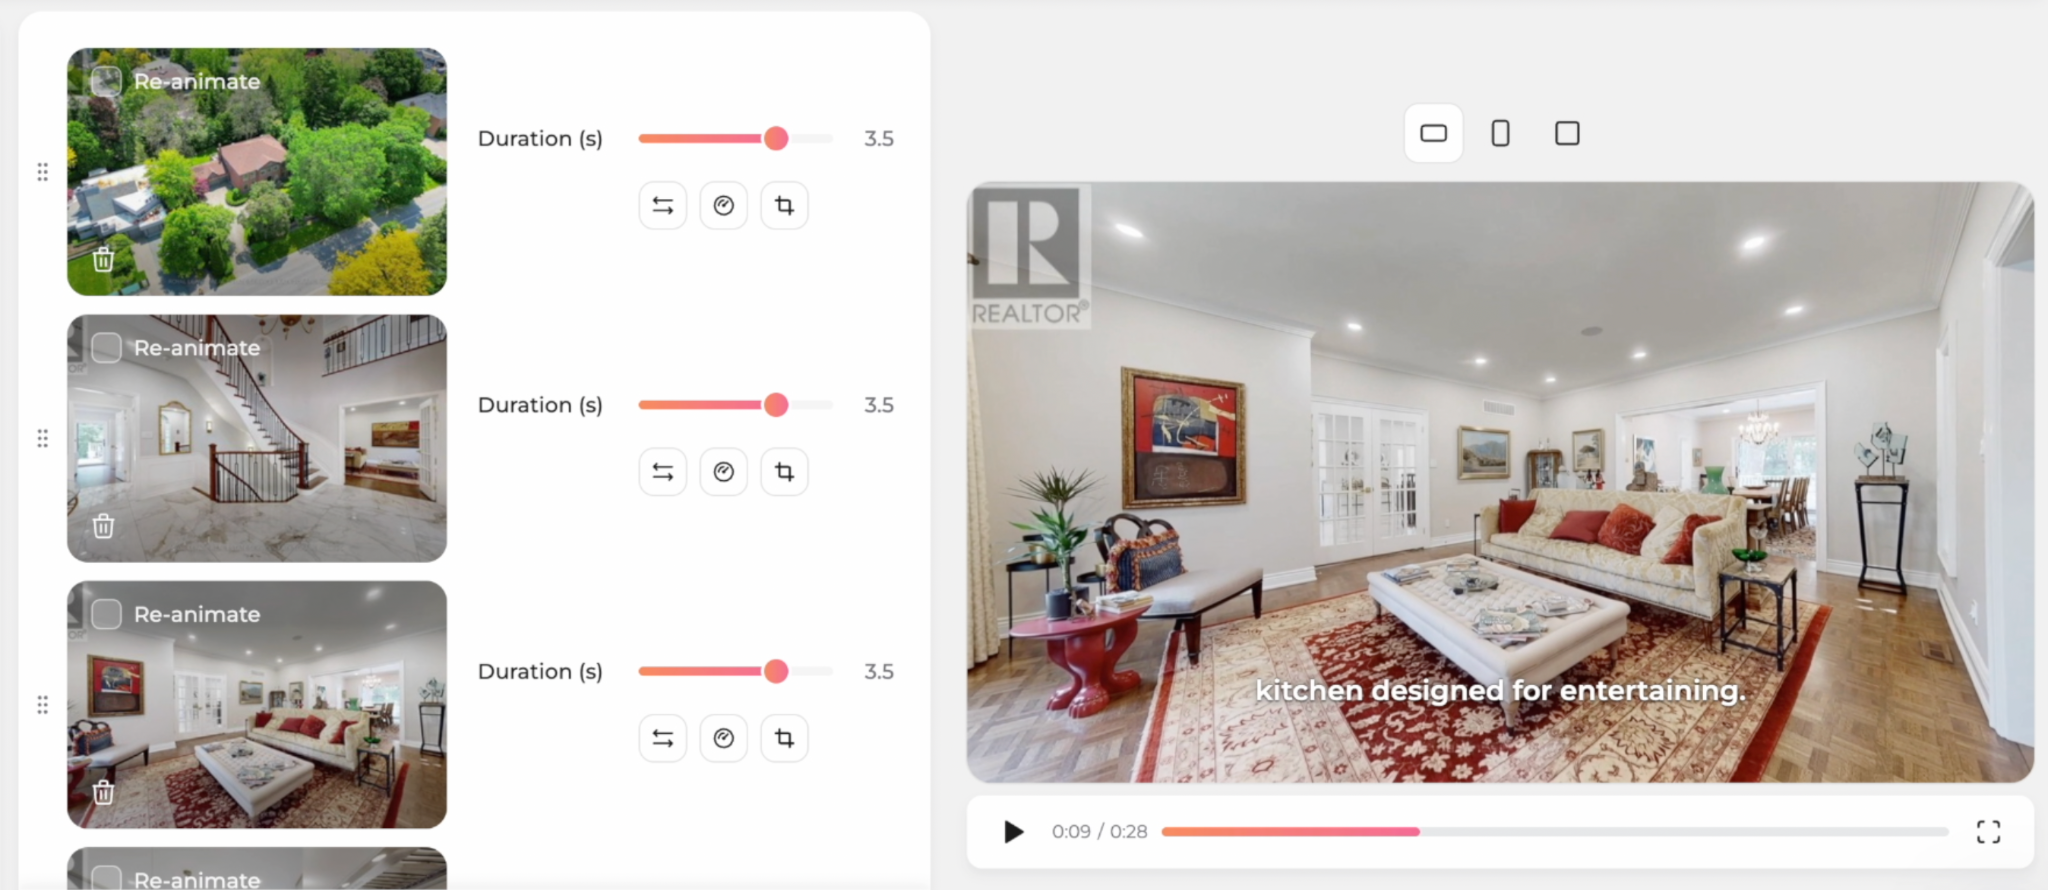
Step 5: Generate and review the video. Processing takes a few minutes. Always watch the full output before downloading it. Amplify lets you adjust clip duration and reorder photos if anything feels off.
Step 6: Export and distribute. Download the finished video and use it across every channel:
The problem: A great listing deserves more than an MLS entry and a few social posts written in five minutes between appointments. Most listings get the minimum, and that shows.
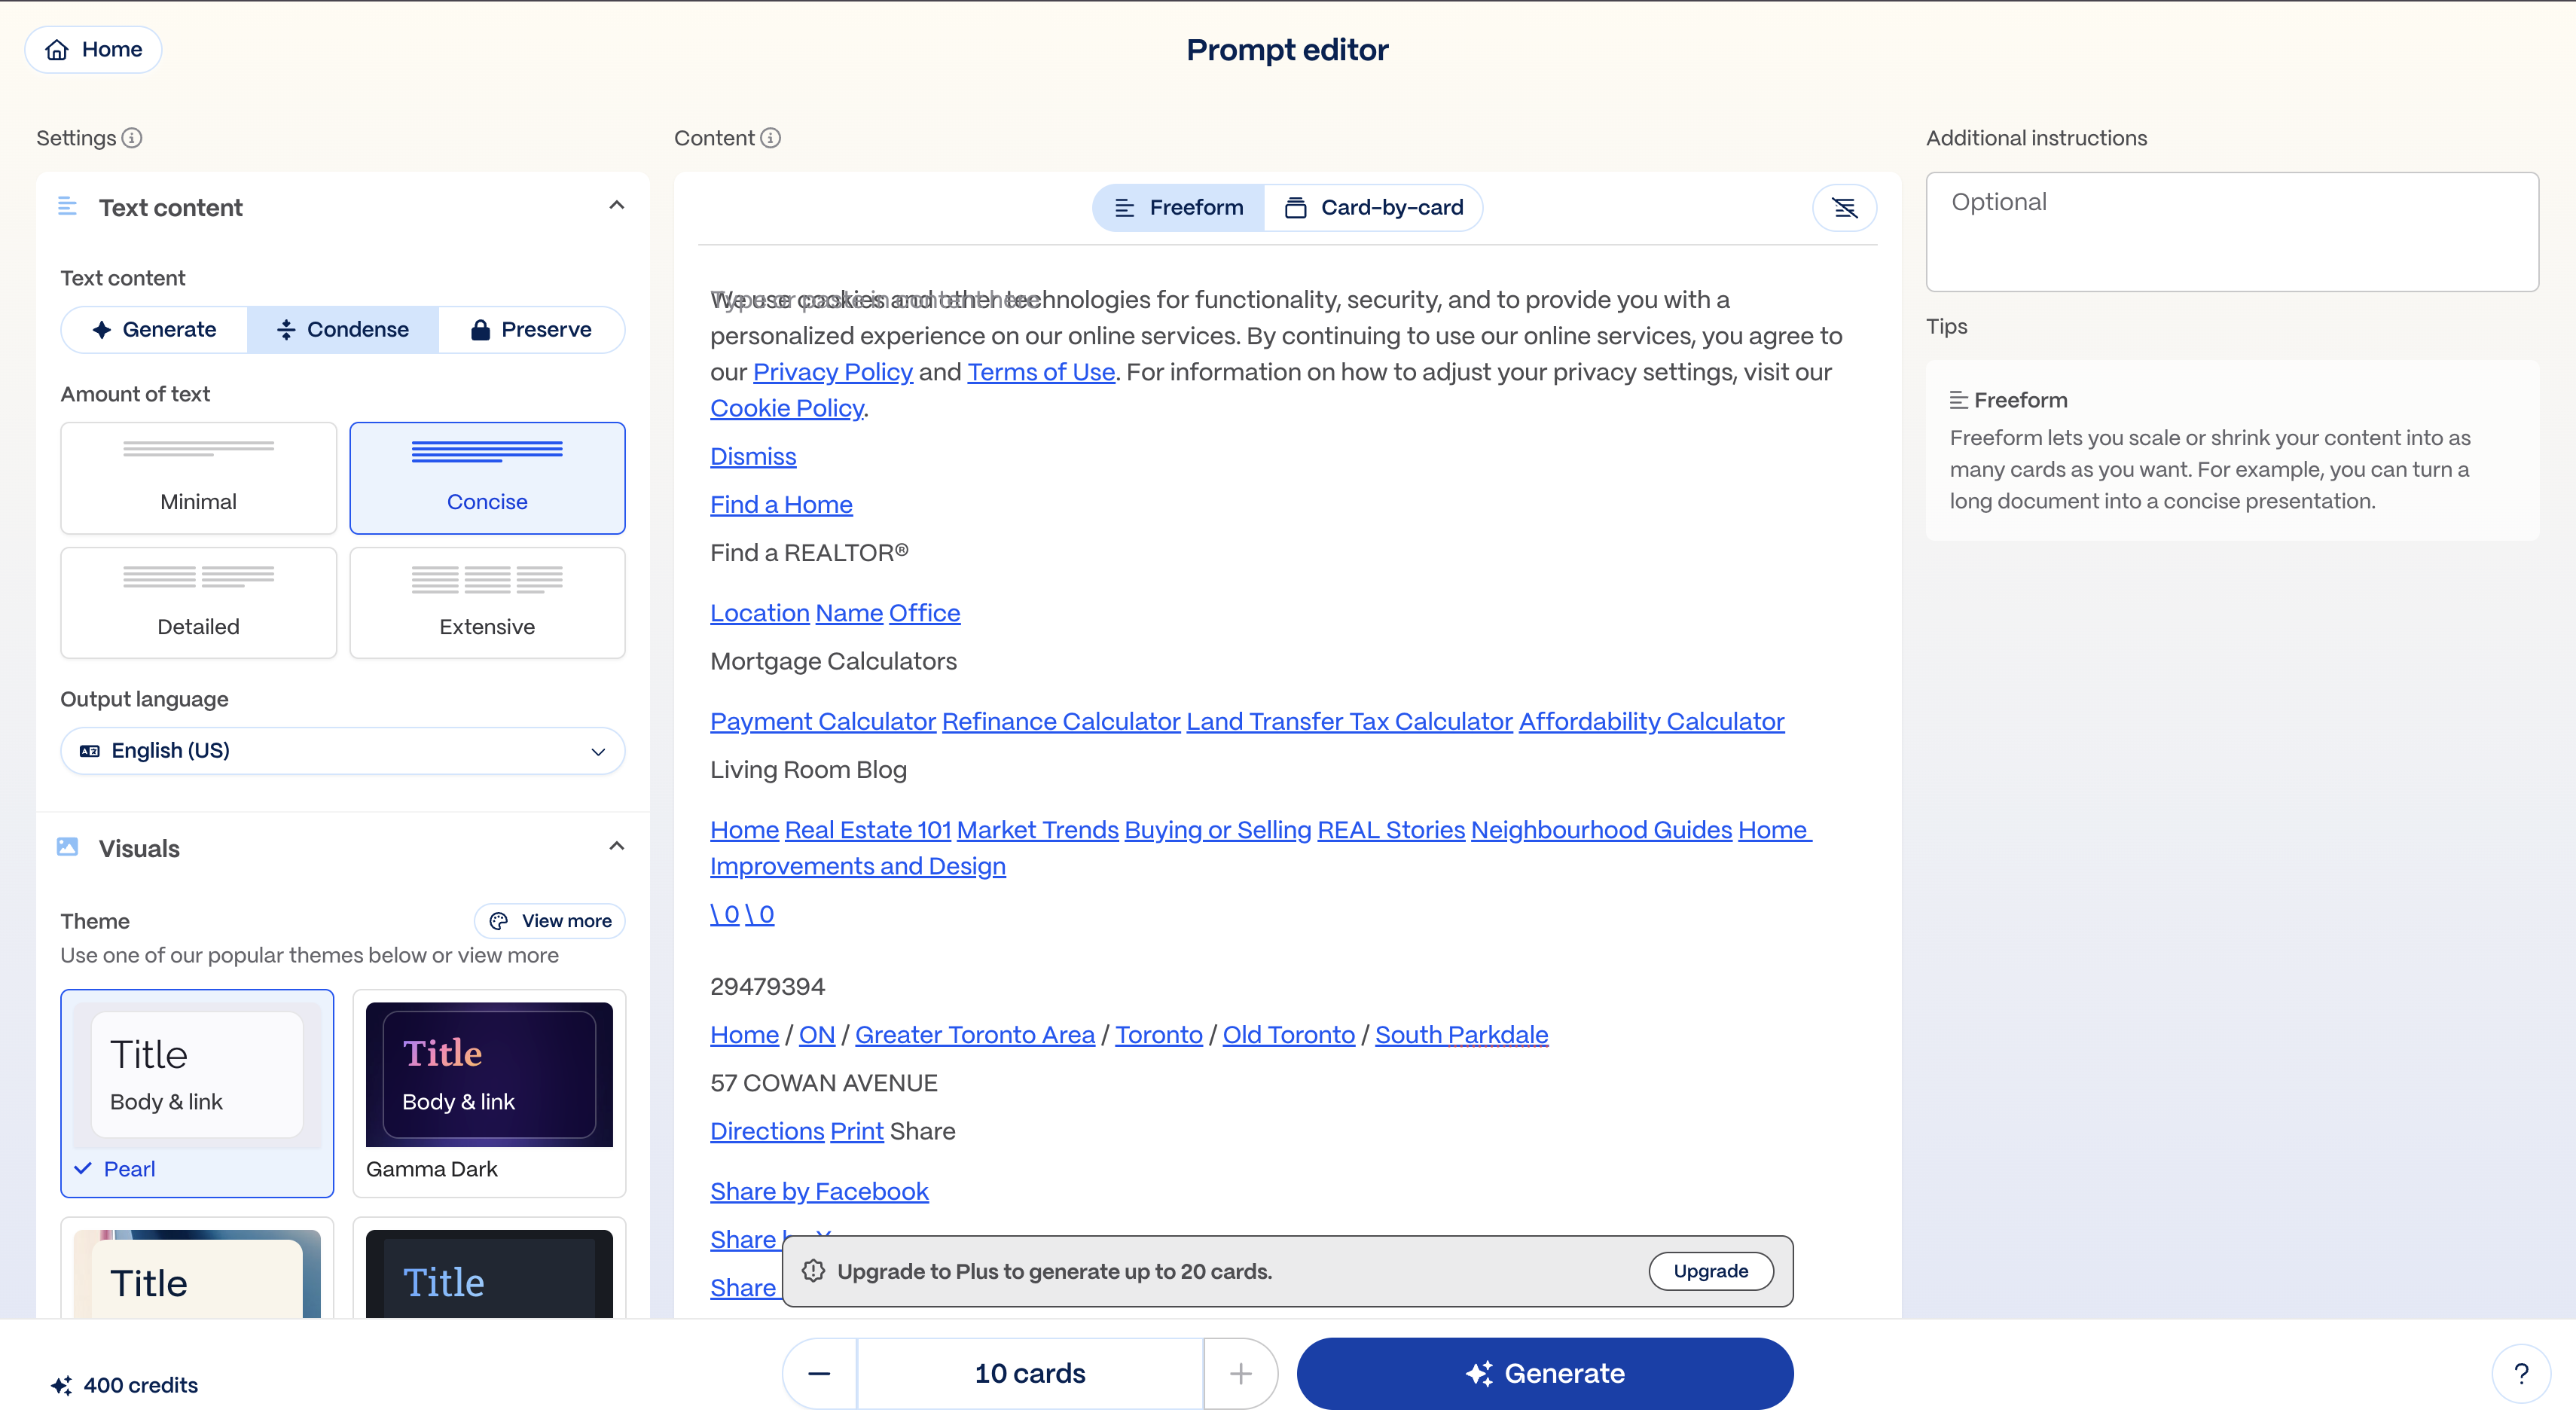
The fix: Gamma is an AI-powered platform that takes a brief description and your key details and generates a complete, polished, shareable listing website, presentation or social media posts in under two minutes.
Time & ROI: A dedicated listing page and social card set produced in 10 minutes versus hours of design work and web development work. This also doesn't include the time for a freelancer and the maintenance for something that will be taken down likely after 30-90 days.
How to get started
Step 1: Go to gamma.app and create a free account. Gamma's free tier allows a limited number of creations per month. The Pro plan at $10/month removes limits.
This is one of the best investments for teams as a new website for property opens up a world of marketing opportunities for paid ads

Step 2: Click "Create New" → "Import file or URL." We recommend starting with a URL as you can provide the listing directly from an MLS website such as realtor.ca or zillow.com. This will prevent details from being hallucinated or forgotten in your prompt.
Step 3: Let Gamma generate the first draft. In about 30 seconds, Gamma builds a fully laid out page with headings, sections, placeholder imagery, and copy pulled from your the URL you provided. They also provide you with the ability to add additional instructions, change the theme and change colors/fonts to align with your brand.
Step 4: Edit the copy to add your local knowledge. Gamma writes competent copy, but it doesn't know anything beyond the listing. Replace generic information and tighten up the CTAs, copy and photos using your expertise.
Step 5: Publish and share. Gamma generates a shareable link for the page. Use it everywhere:
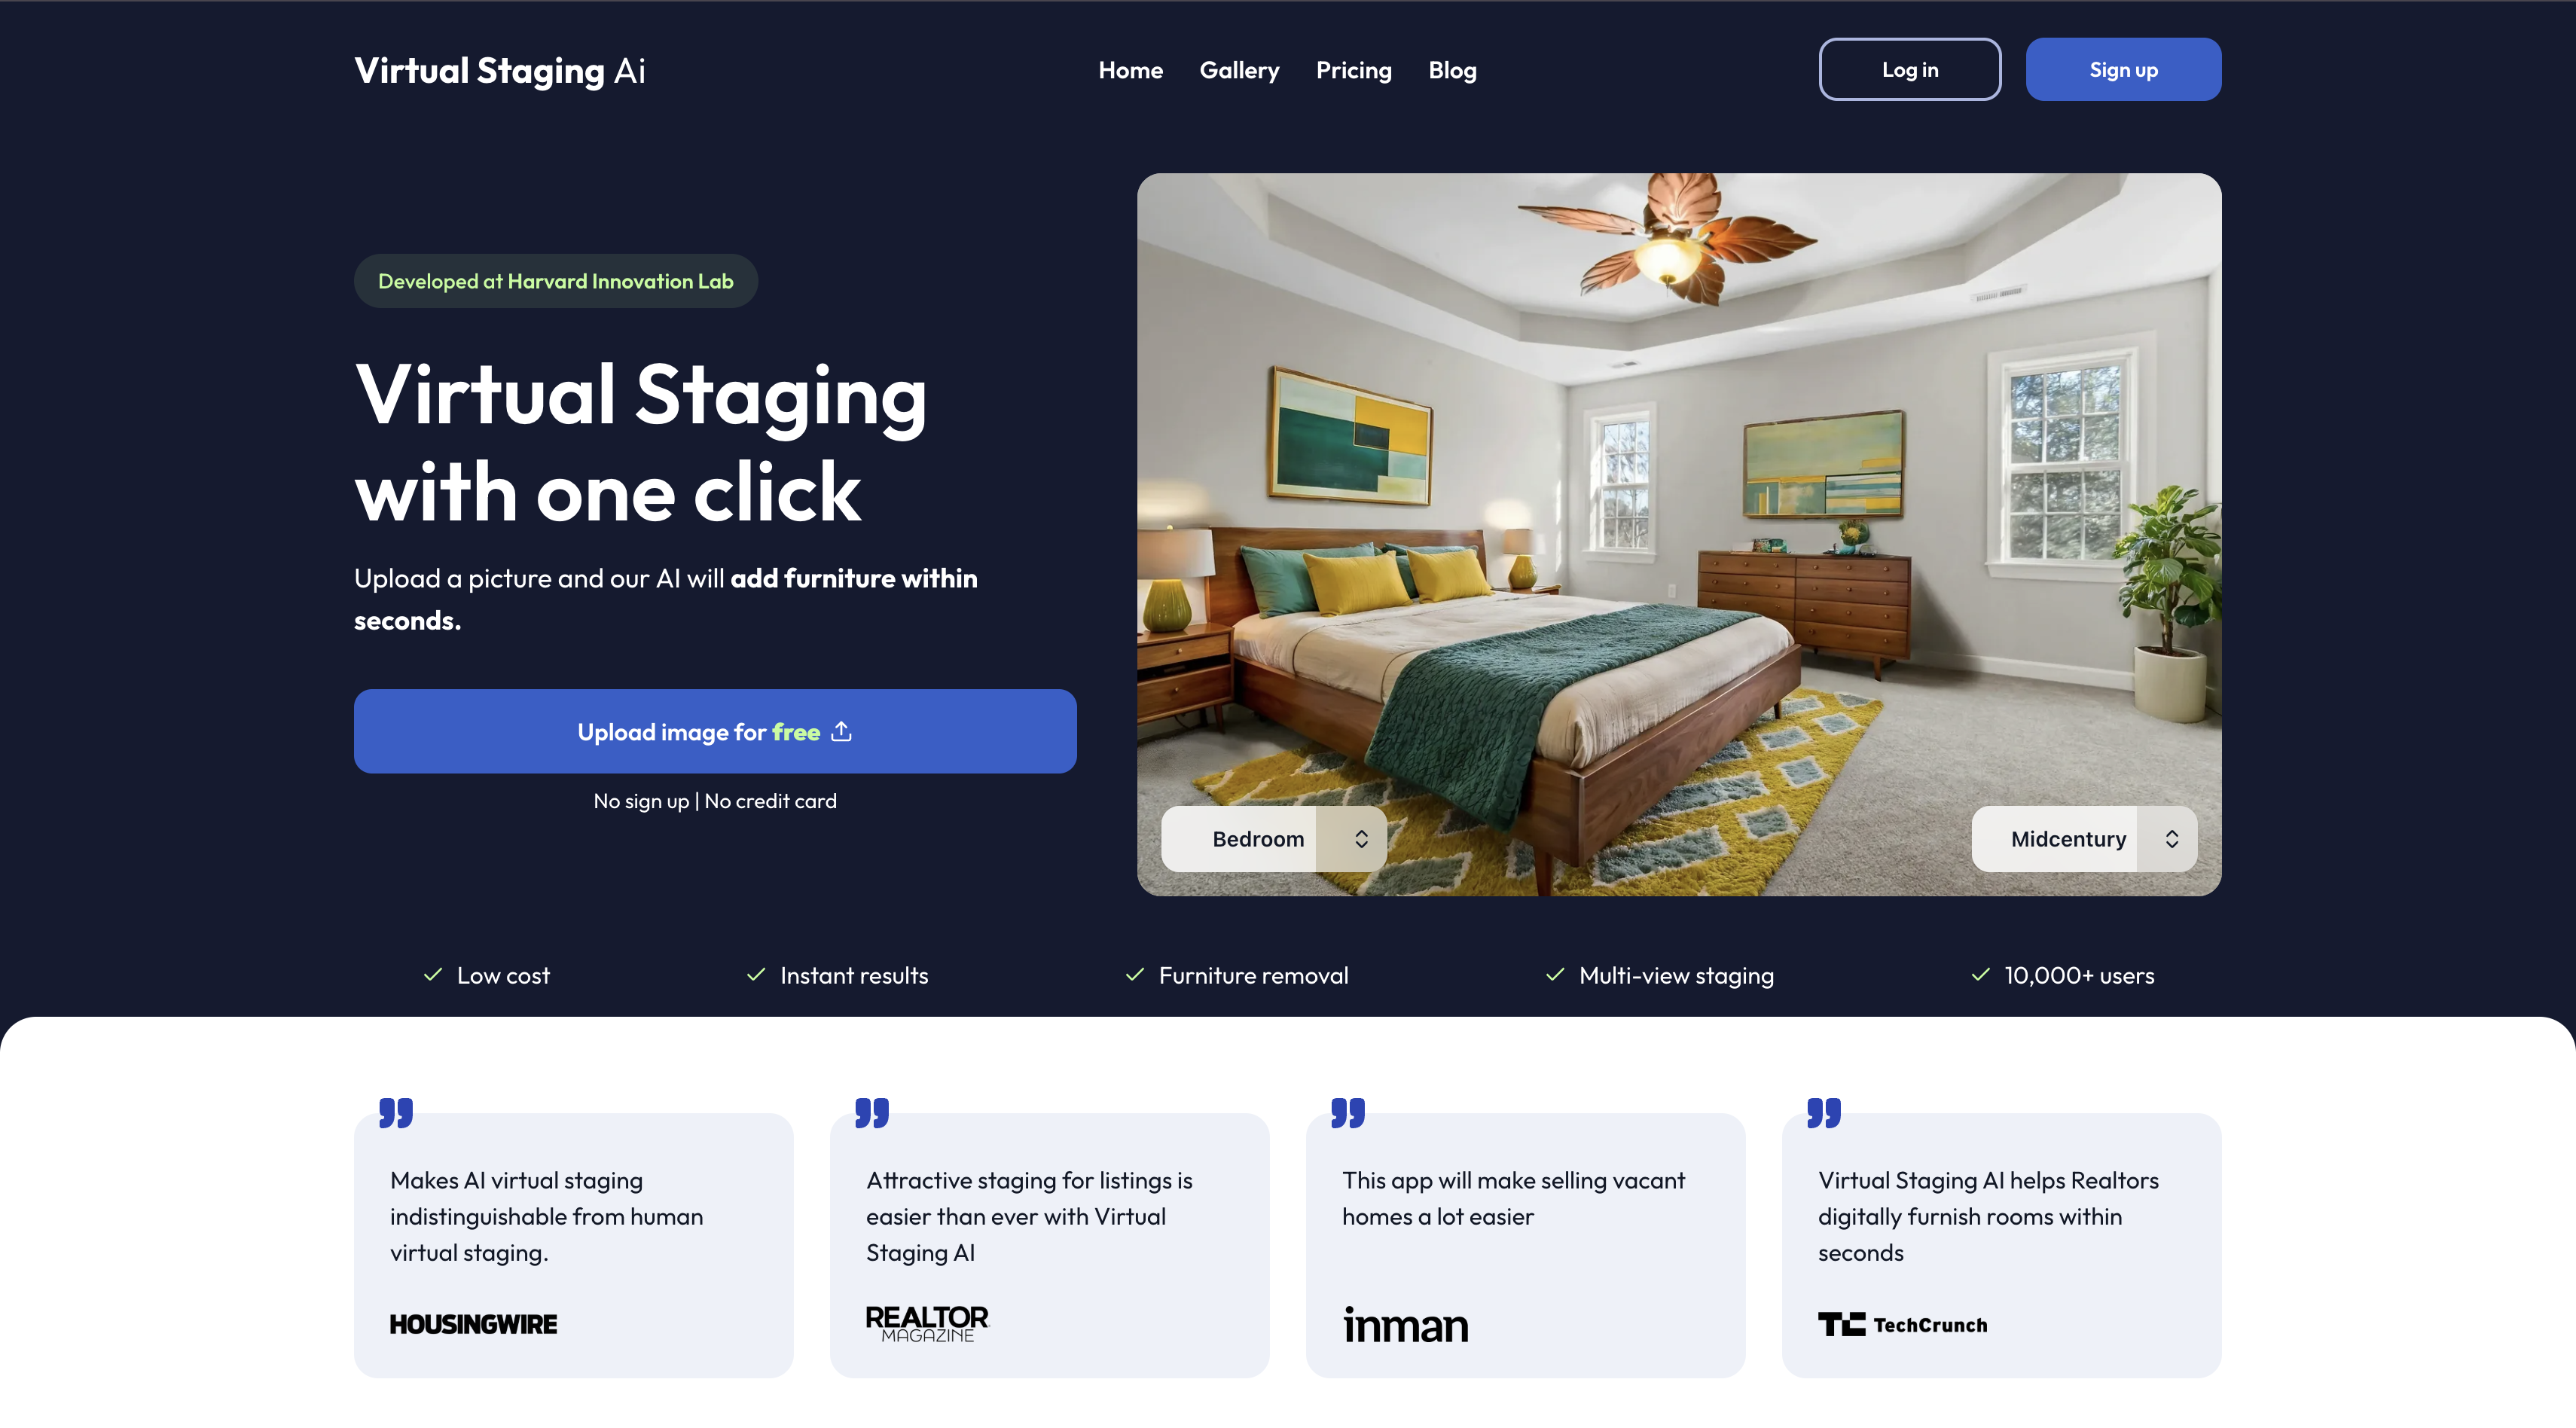
The problem: Empty homes are hard to sell. Buyers struggle to visualize scale, furniture placement, and how rooms actually feel lived-in. Physical staging solves this but it costs $1,500 to $5,000+, takes days to arrange, and isn't economically viable for every listing.
The fix: Virtual Staging AI adds photorealistic furniture and décor to empty room photos in minutes. You upload the photo, select a style, and get back a fully staged image.
Time & ROI: $45–$90 to stage three rooms versus $1,500–$5,000 for physical staging with same-day results.
How to get started
Step 1: Take photos of the empty rooms as you normally would. Good natural light and a wide-angle lens make a difference. Shoot the rooms you'd prioritize for physical staging: living room, primary bedroom, dining area.
Step 2: Go to virtualstagingai.app and create an account. The platform offers a pay-per-image model with no subscription required to start. Pricing runs around $15 to $29 per image depending on the plan, with bulk credits available for teams doing high volume.
Step 3: Upload your empty room photo. The platform accepts standard JPEG and PNG files. Drag and drop directly from your photo folder.
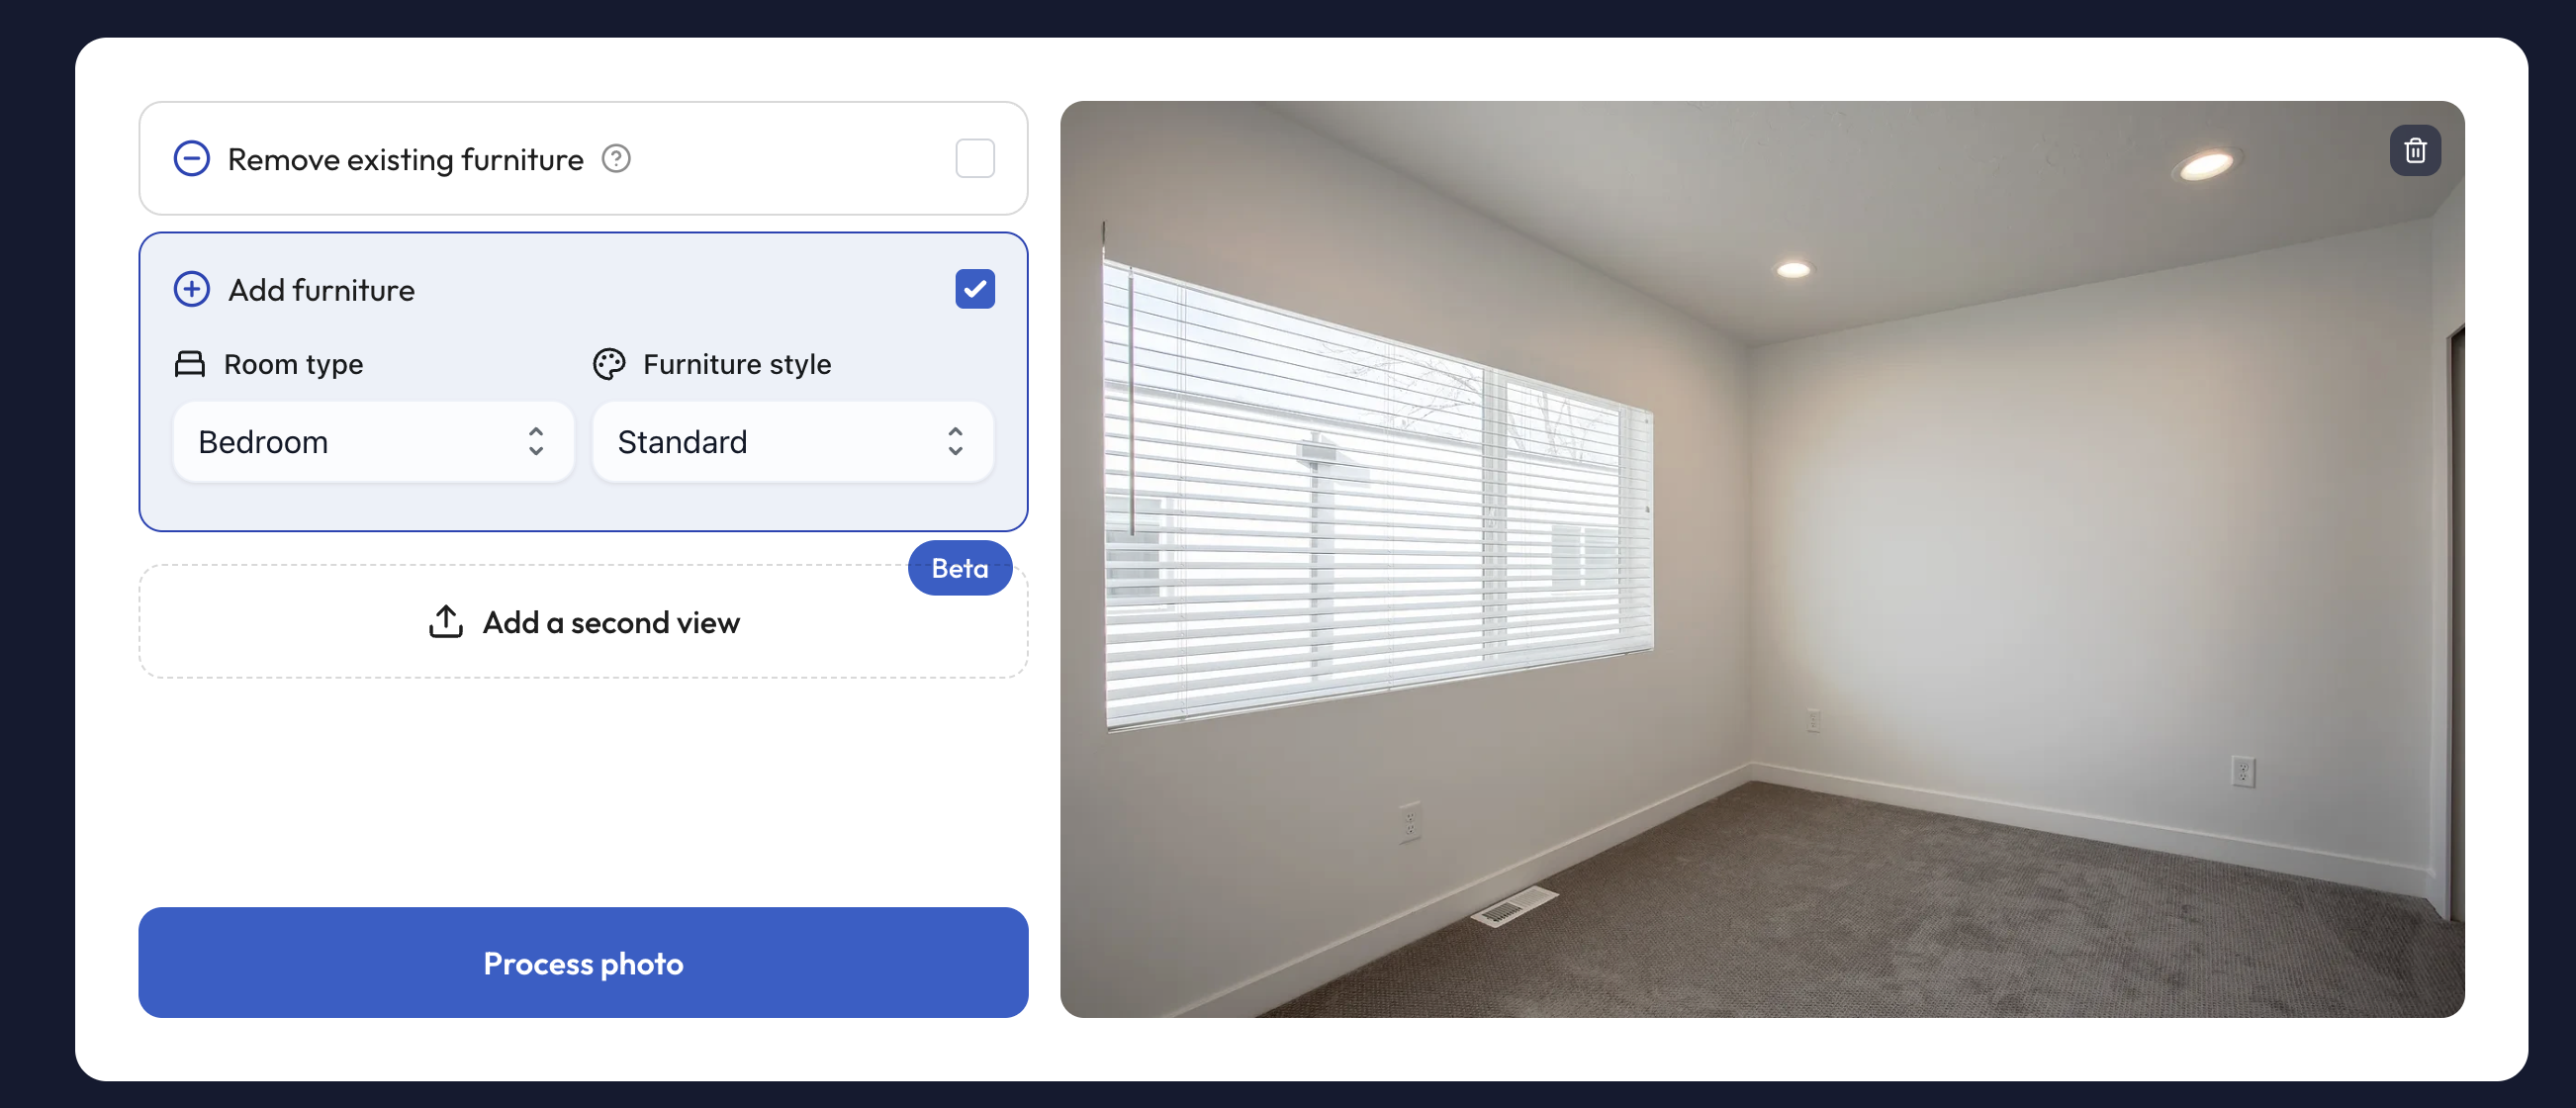
Step 4: Select the room type and furniture style. Virtual Staging AI asks two questions: what kind of room is it (living room, bedroom, dining room, home office, etc.) and what style do you want (modern, contemporary, farmhouse, mid-century, traditional, Scandinavian). Match the style to the property's architecture and the likely buyer profile.
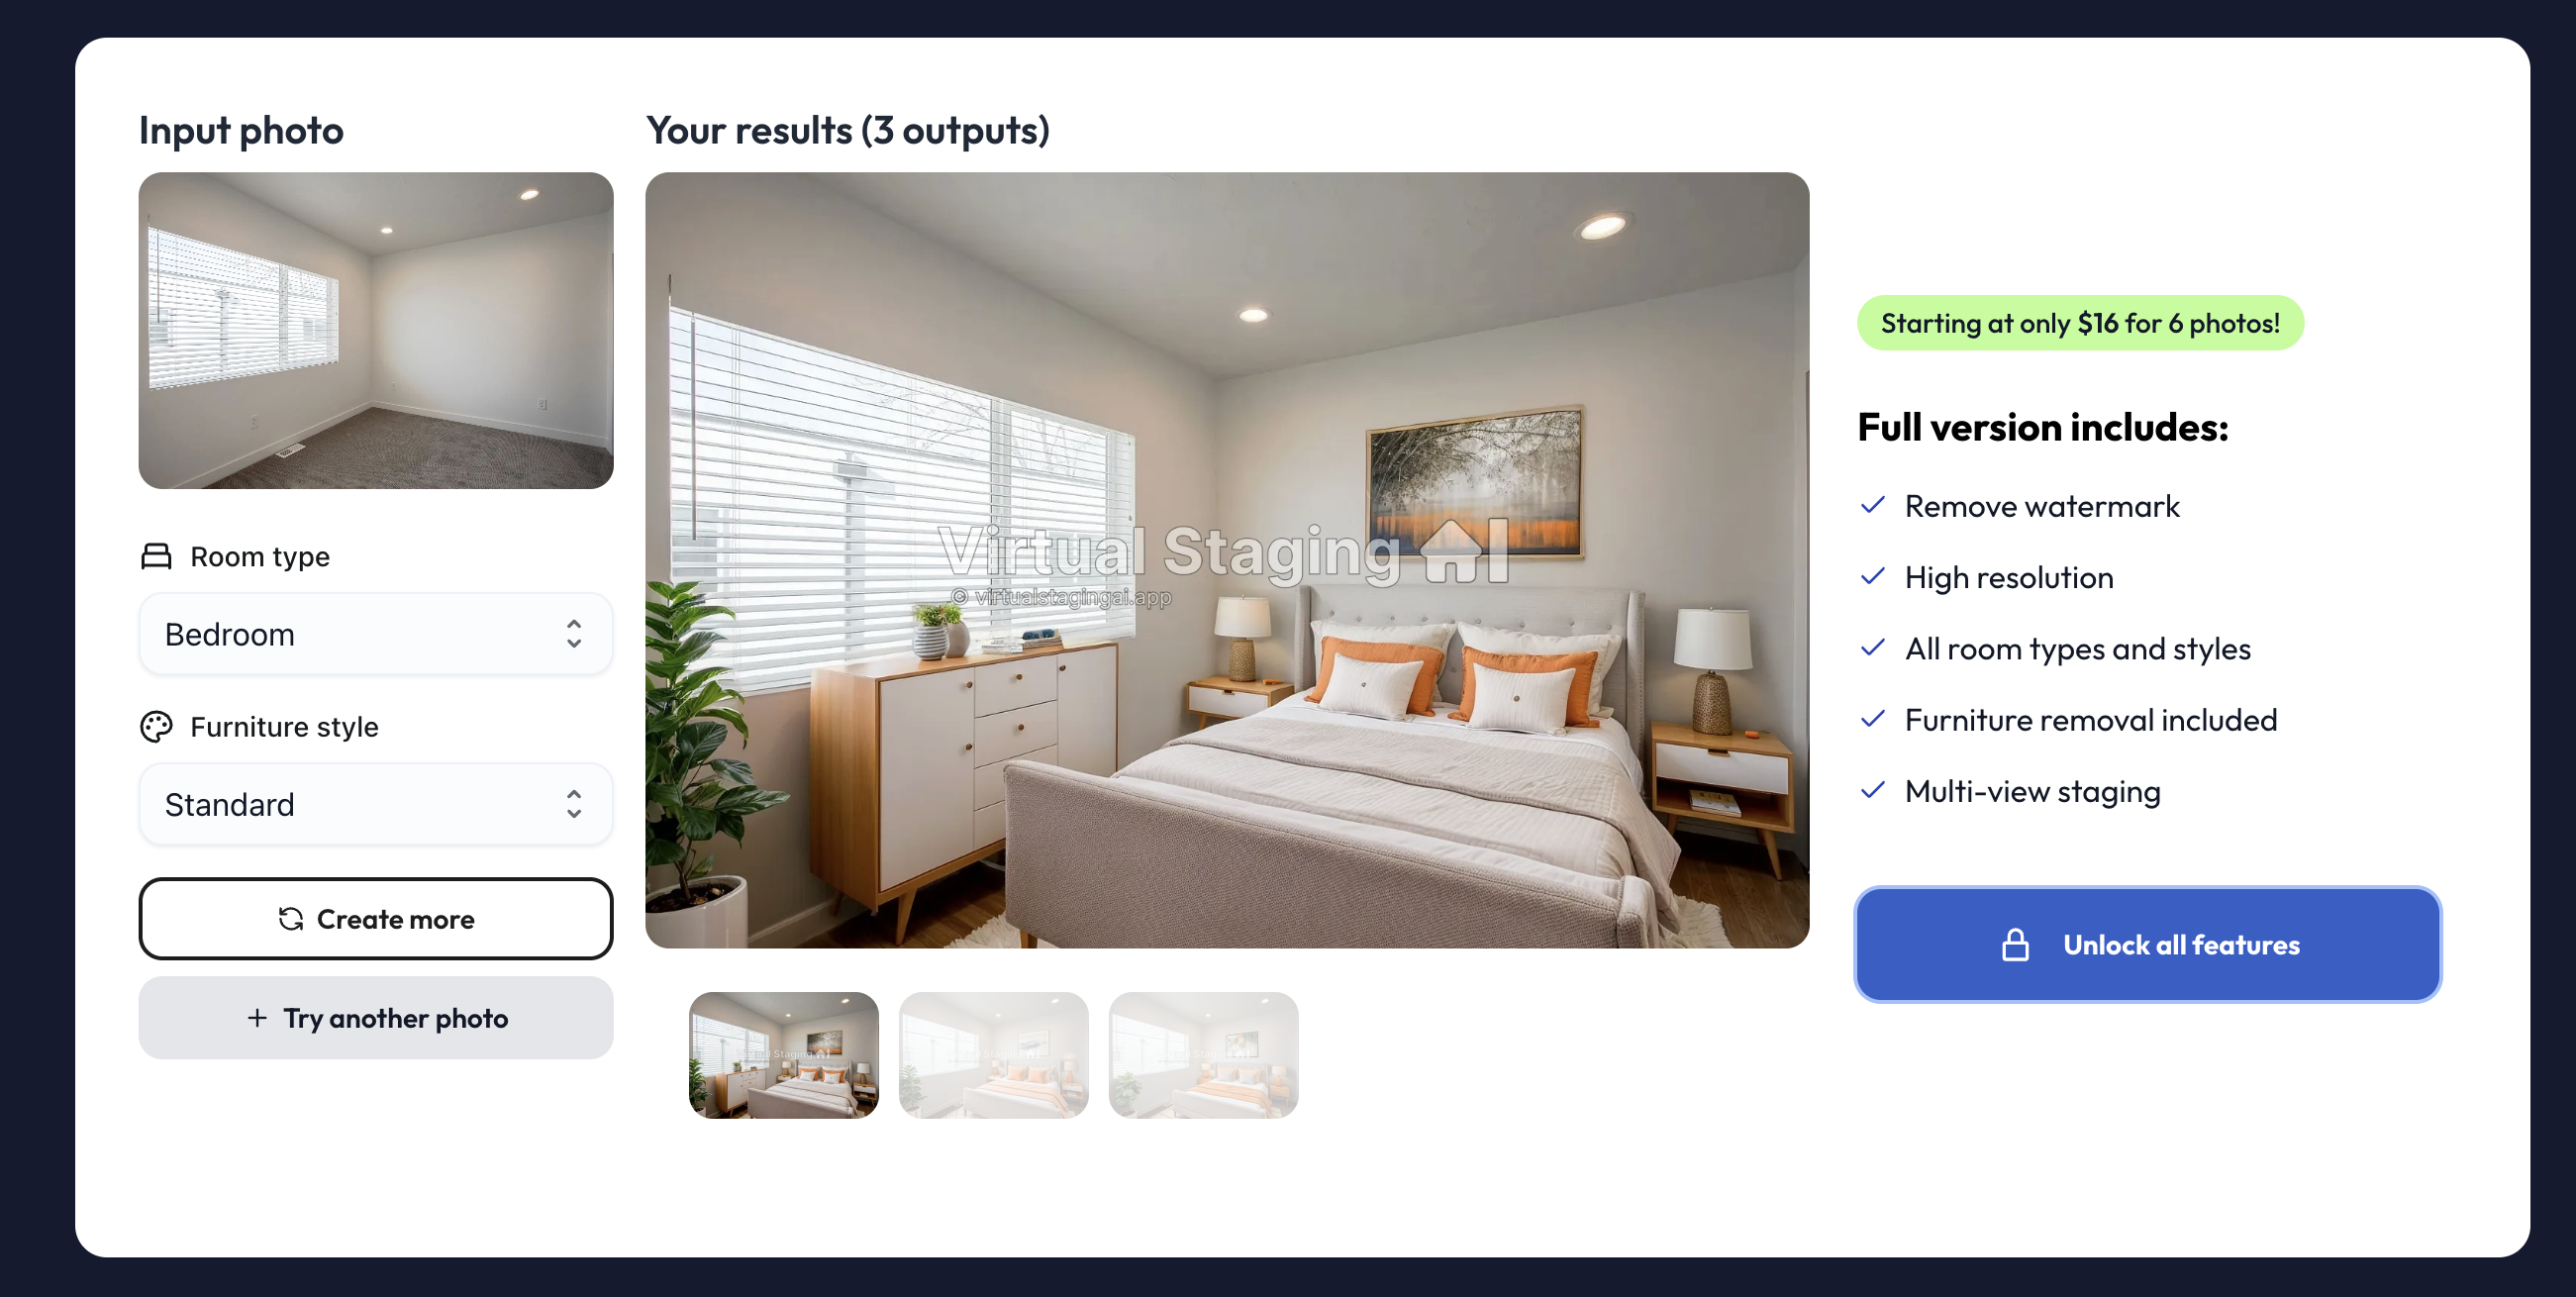
Step 5: Generate and review. Processing takes about 60 to 90 seconds. The AI adds furniture, art, rugs, lighting, and accessories appropriate to the room type and style you selected. Review the result for realism.
Step 6: Use the staged images as your primary listing photos online. Place them first in your MLS photo sequence as staged images get more clicks than empty rooms in every price bracket. Include a disclosure that photos contain virtual staging, which is standard practice.
Step 7: Use the before/after pair in your marketing. The empty-room original and the staged version together make compelling content for seller presentations.
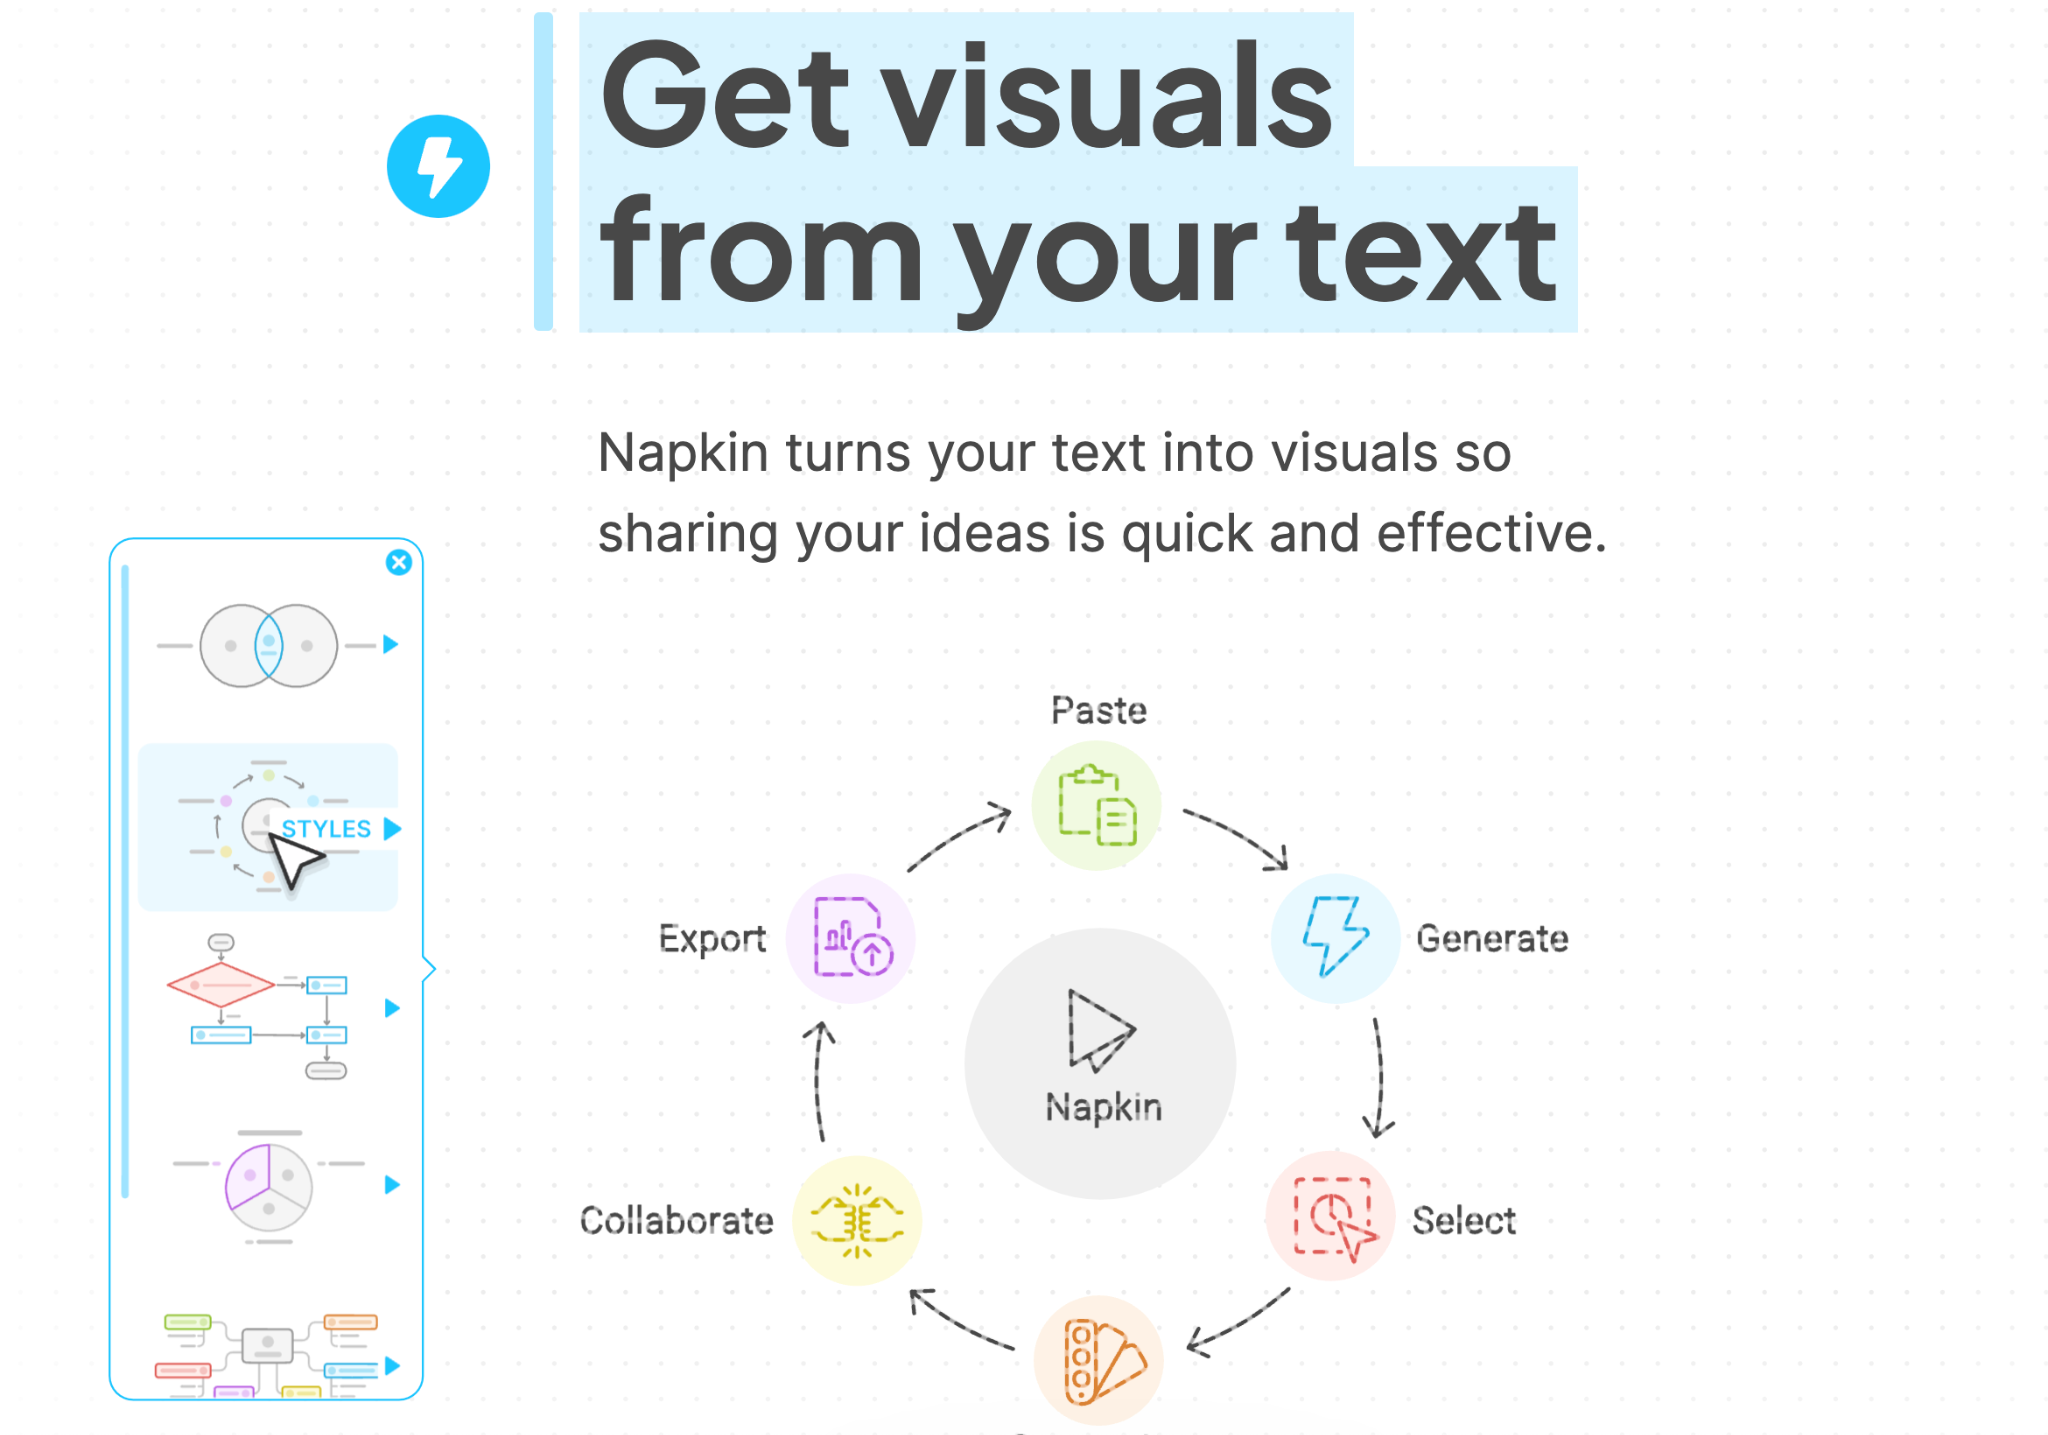
The problem: Real estate is full of information that's hard to explain in text such as the buying process, market trend data, rate impact on purchasing power and neighborhood comparisons. Agents write it out in paragraphs or verbal explanations and watch clients' eyes glaze over.
The fix: Napkin AI turns text into clean, professional infographics automatically. You paste in your content and Napkin generates a visual layout with icons, structure, and formatting already applied.
Time & ROI: A market stats infographic or buyer process visual that would take 30–60 minutes in Canva gets produced in under 5 minutes.
How to get started
Step 1: Go to napkin.ai and create a free account. Napkin's free tier is functional for most real estate use cases. The paid plan ($10/month) unlocks more export formats and higher-quality outputs.
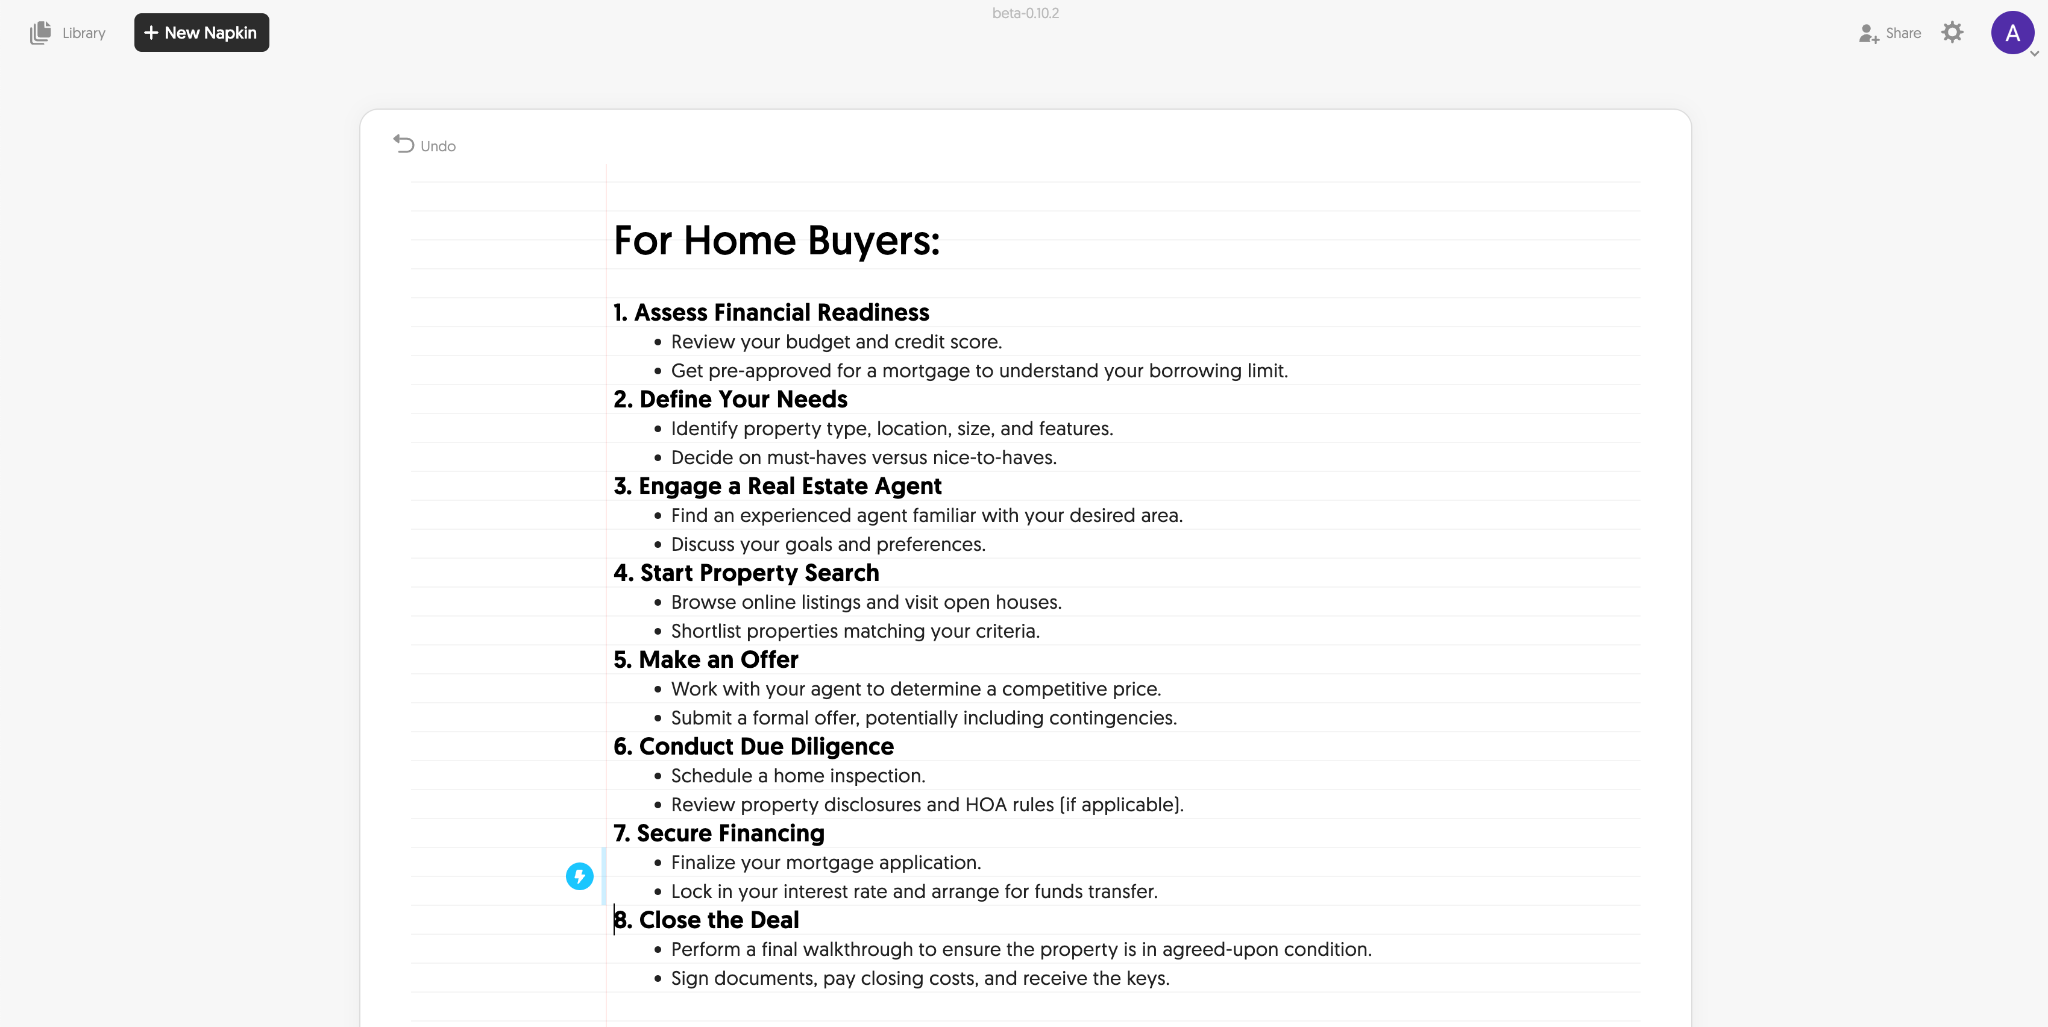
Step 2: Identify your content. Napkin works best with structured, factual content. Good starting points for real estate teams include:
Step 3: Paste your content into Napkin. Write or paste your content as plain text or bullet points.
Step 4: Click "Generate Visual." Napkin produces two to three infographic variations automatically. Each one organizes your content into a different visual structure. You'll immediately see which layout fits the content best.
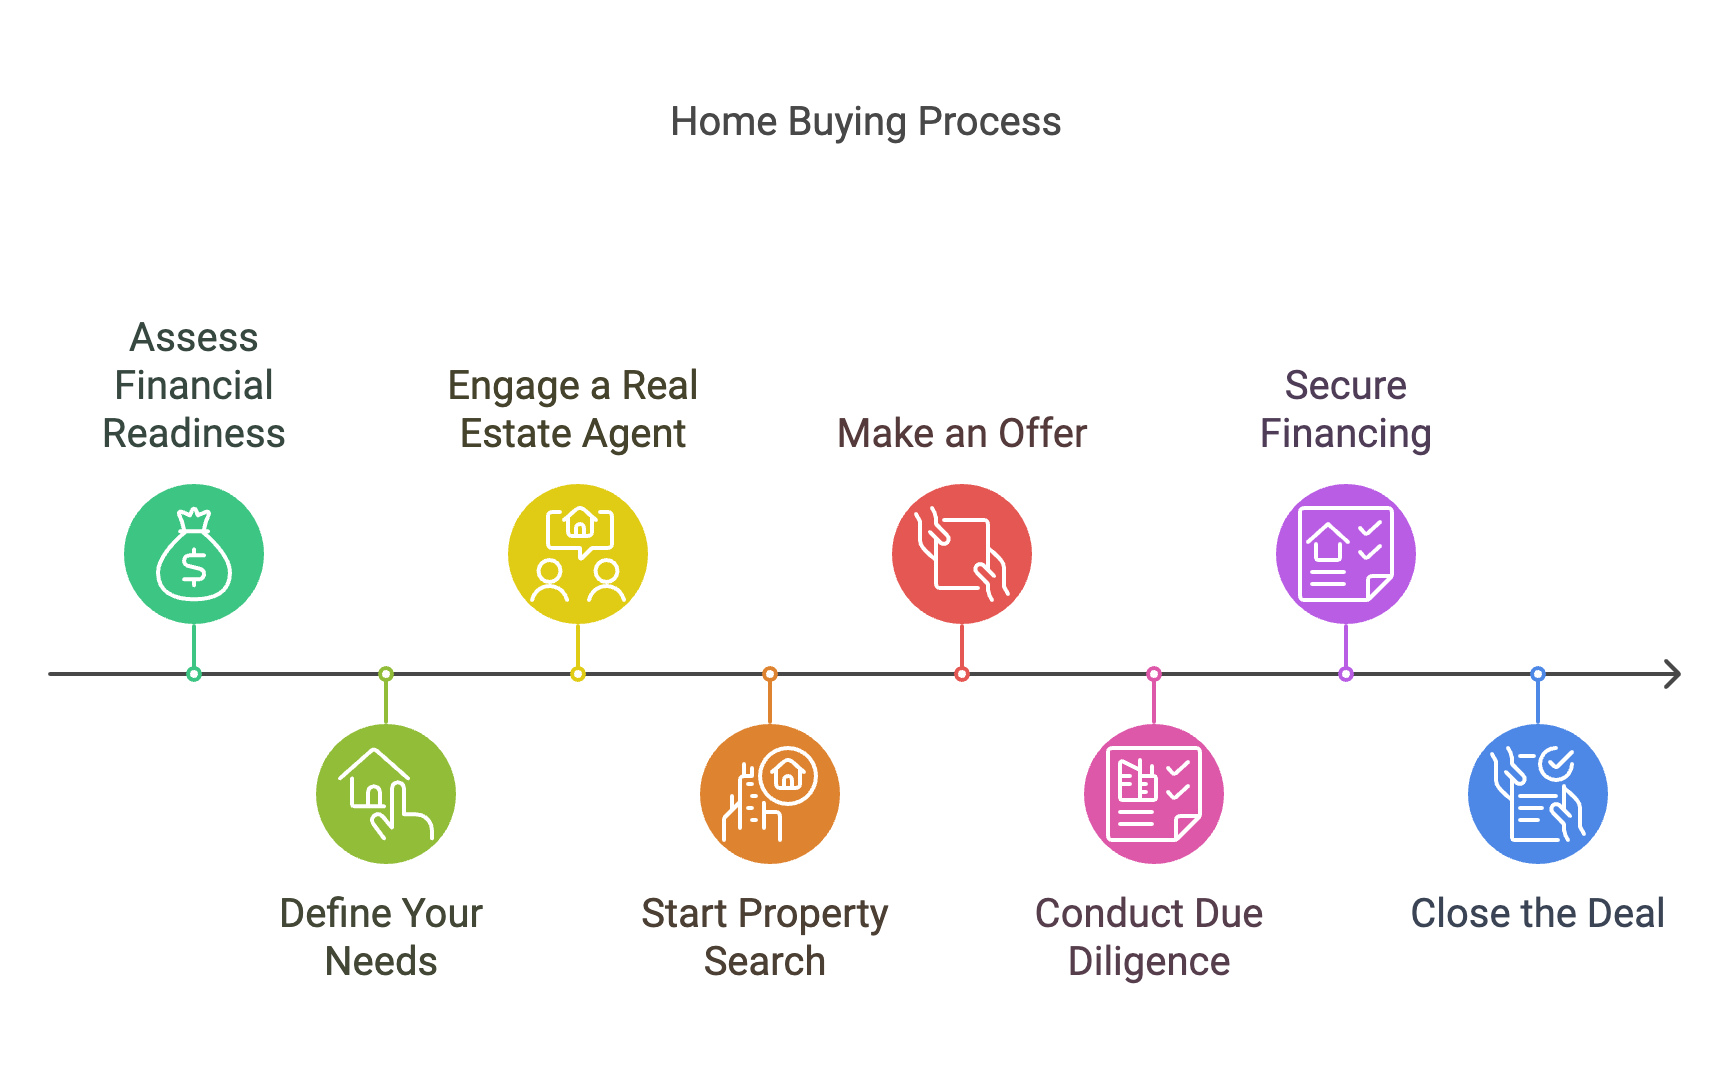
Step 5: Select a layout and adjust as needed. Click into the layout you want. You can swap icons, change colors to match your brand, edit text directly in the visual, and reorder elements.
Step 6: Export and publish. Download as PNG or PDF. Use the infographic across:
AI is genuinely good at volume, speed, and consistency but it cannot replace real estate agents.
It's not good at judgment, relationships, or reading a room.
The stuff that still needs your agents:
AI handles the repetitive work so you can focus on what drives real results: building relationships, negotiating deals, and serving clients.
Start with the area that consumes most of your time, master that process, then gradually add more tools. Remember that AI enhances your expertise but never replaces it.
Ready to transform your practice?
Don't let another potential client walk away because your website wasn't able to engage them and capture their information.
Before you spend another dollar on marketing that doesn't convert, take 2 minutes to see how Madison turns your existing website traffic into a steady stream of qualified appointments.

Within just a few months, Realty AI helped Team Logue capture 15 high-quality leads, resulting in 3 new transactions worth over $3.3 million. This success generated an estimated $82,500–$95,000 in gross commission income (GCI).

Explore what Realty AI can do for your business
By contacting us you agree to both our privacy policy and our terms and conditions
